The wiring diagram of the booth. Video: electrical wiring diagram for the apartment. Installation of v_dkrytoї and combined wiring.
Not a leather home master knows how to correctly lay the electrical wiring in the booth with his own hands. We will help to formulate the foundations for maistra-pochatkіvtsya and equip the houses with light and warmth.
1
Attachment of electrical communications can be set up as an open-ended, and closed way. Vіdkritiy type is laid on the surface of the wall, curving cables with plastic tubes or plinths. Riven of the highest type is not regulated and is chosen fairly. When vikonann, the bundle of cables of various tightness in one plinth was blocked. Moreover, these decorative elements must be chosen from a non-combustible material, which, before that, may have insulating power. At the basement hillside dwellings cables are replaced with additional special brackets.
The electrical wiring of the attached type is roztashovuєtsya in a special way for empty, in the middle of the structures of the hanging stels or partitions. The laying of the power cable is recommended to work at once with the power supply. If there are no ready-made niches, then they will turn, and the furrows will be removed and the wire will be laid. When powering the electrical system for lighting fixtures under the plaster ball, it is necessary to twist the cables, which can seal the insulation.

2
Roblyachs installation of electrical wiring in a private booth, it is necessary to remember that the communications attached to the plaster are due to run ideally horizontally or vertically. Laying cables in all voids, you can take the shortest paths, protecting you with any wire. Installing electrics in the suspended structures of the beds, it is necessary to vicorize materials, as they do not support the mountain. When mounting installation in high water applications, do not stop the darts to wash the casing from the metal.
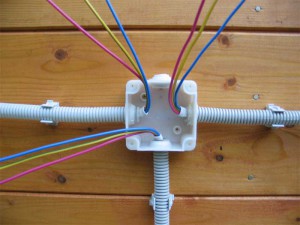
The first step is to start the work, it is necessary to carefully consider how to conduct electrical wiring in the booth, complying with all safety rules. Adzhe incorrectly vikonanі robots can mothers of not accepting the legacy. At the places where the cable is laid out, it is necessary to install special pink boxes, yakі prihovuvatimut mіstsya z'єdnán and protect їх vіd nebazhany zamikannya. Vikonuyuchi, it is necessary to install sockets and vimikachi especially looking.
The height of the installation of the electric cable is regulated independently, but it may not be less than 40 cm from the logs, for the safety of the baggers from the electric shock in case of unforeseeable flooding. Complying with the regulations of safety technology, the sockets should be installed on the significant number of sinks and radiators. Vіdstan mіzh tsimi objects may buti less than 50 div.
Installation of sockets at the premises, skhilnyh to high water (baths, saunas), is allowed on the vіdstanі, scho overhanging 2.6 m from the dzherel vody.
With the installed electric motors of that other power possession, it is necessary to choose a model, access to the internal part of any possibilities is only for additional special tools. Connecting the electric stove to the cable, which can be re-cut and covered with a metal sheath. Such a wire can be laid under the light, choosing the shortest route from the automatic machines to the fitting.

Before laying the wiring in the booth, it is necessary to lay down a report plan on the paper, indicating on the new skin the vimikach and the dressing of the scorching and power devices. For additional help, the scheme can be accurately developed required quantity the cables of the singing cut, which allow you to seriously protect the bones. Let us tell you, how to fix the electrical wiring in the booth, and to find the best way to electricians, people can do it independently.
3 Carrying out the booth with your own hands - let's get to work
Installation of electrical communications does not become anything folding, smut - ce dotrimannya necessary sequence, and obov'yazkovo everything goes. So, it’s time to start without delay before discussing the process, like building an electrical wiring in a booth.
How to wire the wiring in the booth with your own hands - pokrokov's scheme
Croc 1: Rozmіtka
First, start the installation, regardless of the chosen type, it is necessary to make a rosette, having laid it without a middle on the wall, de-rotting the roses under the boxes, vimikachi and, of course, sockets. It is also necessary to indicate the route of the passage of wires, de stinks are mounted. Rozmіtka fight for help credy or marker and long line. As a simpler option, in order to determine the cable passage, you can twist the kapron cord, turn it into a bright farboa.
Krok 2: Preparation of landing sites
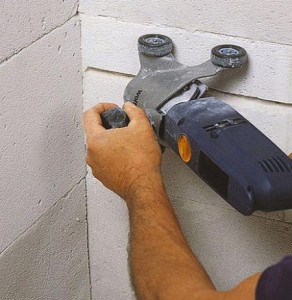
For the help of a perforator in the areas, de-stash the boxes, it is necessary to open the door, the diameter of which is not to be changed by 70 mm. And there, de transferring the entrance to the dart, they make their way through additional digging to ease the installation work. When working with a perforator, it is necessary to periodically soak the drill with water. Help save the drill, that saw will be much less.
At the places where electrical lighting is carried out, it is necessary to open a wall with a small diameter to the other place. As if a private hut was created according to the plan to be installed in the wall, in it it is necessary to build furrows to make schemes. For tsgogo pіdіyde grinder or specially appointments budіvelny shtroborіz. Practice with a grinder or a perforator, for the sake of your health, it is necessary to take care of the sings of safety.
Krok 3: Installation of electrical wiring
Laying the darts, it is necessary to collapse under the rozpodilny shield at the straight mounting boxes, step by step moving to the lighting fittings. Fixation of the cable on the wall is necessary to work for additional reinforcement, as it is installed on the stand about 30 cm. For fixation, you can beat all the leftovers and cuttings of the dart, nail them to the wall, crying with the cable that is being installed. It is also possible to secure communications, deposits in burial, for additional cost of adding alabaster.
Krok 4: Installation of mounting boxes
At the booth, it is carried out before the plastering is done. Rozpodіlnі boxes vstanovlyuyut behind the help of alabaster rosary, a small number of such pawns at the burial place. Insert the first element below, start the darts in the new one, then, from the stoppage of the singing force, press the opening of the mass, but so that the edges of the box protrude above the surface of the wall. All similar elements are to be found on the same horizontal line for the equal distribution of vimikaci.

Croc 5: Shooting Darts
Nasampered z provіv znіmaєtsya ball _izoljatsії on vіdstanі up to 5 cm vіd kіntsіv, relatively at tsmu їх it is cleaned. Potimm, respect Stegachi for Tim, Nikochi's bus not overcoming, Skruchuєmo at the additional Pasatyzhіv, Vіdkushuchi Zavі Kіntz Kusachki, at the Czech of the Cocks of Cockpiece not 3 cm. S'єєDnavi in the trunk order of the dart, ї іsoluyu Zvitch, the Іzolette, the shouting of the shrinks of the boxes. Having completed the installation in such a manner, you can connect the electrical wiring to the booth to the central power lines.
Z Necessary vikonannya electrical installation robots early chi pizno sticks to the skin. The reasons can be different: relocation, replanning of the territory, departure from the harmony of the old wiring. The number of survivors of electricity is growing with skin fate: it is important to identify the alarms modern people without a computer, an air conditioner, a micro-furnace and other auxiliary helpers, like to live in the garden. Inevitably, we were able to change up to the systems of electric power supply, obshtuvannya їx with the improvement of new standards. Someone who cares that the electrical wiring in the hut is a task, vikonati like no more force for professionals. Zim does not compete, but for the obviousness of the bajan, supported by theoretical knowledge and practical skills, it is real to work independently.
Preparing to come in is composed of a number of stages, skins from some of the initial values. Here you can see rozmіchuvalni, penetrating and harvesting work.
Choosing tools for installation
The most laborious occupations are made to drill the grooves (strobe) for wires and prepare the openings for sockets and vimikachiv. The robot is significantly relieved by an electric drill and a wall chaser. The wall chaser looks like an angle grinder with two diamond disks covered with a slotted casing.
It is also necessary to prepare wire cutters with insulated handles, pasatizh, an indicator for re-verifying the presence of life in a fence, alabaster, electrical tape, vimikachi, sockets, lamps, installation and rose boxes, darts. You may need channels, cable.
Rozrahunok electrical wiring
Rozrahunkov's robots important moment at the top of the power supply, how to conduct electrical wiring in the booth.
When choosing the next step, take it to the extent of your reparation and the minimum tightness of the electrical appliances. At the kіmnati, de vykoristovuvatimetsya technique of high tension, retinal may be greater.
It's important!
The intensity of electrical appliances is indicated on the passport. For kitchen appliances, a cable is used to transfer an ocremic cable.
It is necessary to be careful that the darts with the middle veins show more richness, the lower ones are brothers of aluminum. Mostly zastosovuetsya two or three-core wire type APV, VVP, APPZZ with a cross section of 4.5 mm2. Tri-core cable vikoristovuetsya when chandeliers are connected from two modes of operation.

Razrakhovuyuchi dovzhina drota, do not forget about the number of mounting points (widths, sockets, good boxes). For a skin point, you need at least 10 cm of needle. Pіdrakhovuychi іlkіst kіlkіst spolіvnyh korobіv, remember, scho tsey pokaznіk zalezhі vіd іlkostі rosettes і vіmikaіv.
How to expand the territory
One of the most important points of carrying out electrical installation work is the folding of the circuit, as well as the chairs of your booth from the designated points for the distribution of sockets, vimics, lighting fixtures.
It is necessary to lay a path for the head bundle of darts in front of us. Horizontal boards are laid on a 20 cm wide stele, where the turn can be 90 degrees. Rozmіtku fixing conductors can be carried out from extreme points.
To increase the efficiency of the robotic rozmіchalny cord, pofarbovaniya blue abo vugillya. One point is closed, and the other, pulling up in the roaming area, is thrown down with a sharp hand. On direct traces, devoid of a cord, the space of fastening the wires to the steel and walls is not foldable.
At the descent to the vimikachi and outlets, the outlets are installed in the vіdgaluzhuvalni boxes. Attached electrical wiring at the booth there is a choice of similar plug sockets and vimikachiv, which are mounted in installation boxes with a diameter of 70 mm.
It's important!
Wimikach should be placed on the side of the door handles, but so that the doors do not stick. Vіdstan vіd pіdlogi - 50-80 or 150 cm.
Install better in the kitchen I will use the socket, not forgetting about the introduction for the connection of a cleaning and additional lighting in the zone of the mitt. In living quarters on the skin 4 meters may have 1 socket. Do not install sockets with gas / electric stoves, sinks, water pipes.
For special respect, meritorious appointment with the promotion of equal water. It is not possible to install sockets and faucets in the zone where the tap is located and in the zone of the bath (shower, sinks). Here it is allowed to install plug sockets, protecting ELVs, in a space with a radius of 2.4 meters from the washbasin.
Trochi about droti, ELV and automatic
Priestry zahisnogo inclusion(EPV) appointments for zahistu vіd strumіv vіdnіknennі vіtoku. For bathrooms dotsilno vikoristovuvat ELV class A up to 30mA, for sockets - automatic type for strum 25A and ELV for 30 mA. For the line of illumination, turn on the automatic machine for 10A type.

After seeing it off, then, as it was already guessed, it’s better to bathe midnas. It is customary to see three ways of closing: soldering, twisting behind an additional clamp. Twisting through the security today is practically not zastosovuetsya. As an alternative to vikoristovuetsya bandage twisting, if the cables are creaked with a medium wire of a smaller cut. The best option for home minds is the use of a terminal, which is a good way to trim the cable.
See the wiring harness
Installation can be done in dekilkom ways: we attach, we add, and we combine.
The electrical wiring is fixed above the suspended steles, at the empty buildings, at the monolithic pipes, at the middle of the partitions. Horizontal boards are laid at the ball bearings, made of fireproof materials.
As soon as it falls on the partitions, it is necessary to vicorate the darts, protected by a mechanical shell, as they are laid under the overlapping slabs on the 200 mm stand. The fastening can be secured as much as possible close to the base of the strobe. Distance between anchor points - 0.5-1.2 m.
For rozvedennya pіd podvіsnimi stele, vykonanih z materials flammability class G1, you need cables z іndex NG (shto not rozpovsyudzhuyut gorіnnya). Materials of class G2, G3, G4 are used for stowing darts in metal hoses. If the wiring is carried out in the saunas and bathrooms, then the fahivtsy will make it easier to put the cables in the sheath with polyvinyl chloride.

V_dkrita electrical wiring is carried out along the walls, cable plinths, plastic channels. It is important not to zmіshuvati low-current, illuminating that power darts. Channels and plinths are due to the mother of electrical insulation power.
Let's take a look at the main stages of electrical work.
Installation of socket outlets and vimikachiv
Plug sockets and vimikachi buvayut prihovani ta vіdkritі. For the installation of power sockets and vimikachiv necessary sockets, prepared from stream-conducting materials (orgskla, wood, getinax and other).
The stench is attached with screws or for additional glue KNE-2/60, BMK-5. The sockets are fastened to the socket with two screws, they are installed in the phase cable shedding, which ensures safety when replacing cartridges and lamps.

Attached sockets that vimikachi mount at plastic or metal boxes of type KP-1,2, U-196.
Boxes of good, happy, restoring
When buying, be aware of the certificates of validity. The boxes are made from fireproof materials. Lifting of cables is carried out for additional charging, pressing or clamping.
It's important!
The place for introducing cables at the installation box is protected by bushings made of non-combustible materials or by pieces of a PVC tube.
In kіmnats with low water, you can place darts in empty ceilings and niches in the walls. The walls of the nests are linen buti without shorts, the lids are made of non-combustible materials.

Installation of a rose shield
Rozpodіlny shield- an invisible component of the electrical supply, whether it be an application. When installing the wiring, it is necessary to think over not only the roztashuvannya, but also to choose the system of protection, to determine the number of lines.
Thinking over the dislocation of the rose shield, protecting only the interior and the aesthetic features are not enough, it is necessary to comply with the standards. The main advantage is accessibility, tobto. organization of operational access for the needs. The shield is to be fixed at a height that is good for visual inspection (1.5 meters).
It's important!
Rozpodіlny shield not varto rozmіschuvat in boiler houses, but also in watery and powdered places. Dry, clean accommodation, I will add the term of exploitation to the sprat of development.

Important nuance - connection
Carry out electricity - right, top-down - connect internal wiring to the required energy meters. Here the bagatioh blame the problems, tk. Tsі dії mainly to carry out organizations that can provide all necessary documentation.
This means that you have to worry about the presence of some papers - an act about the attachment of robots to the power of grounding (like a new house), check the electrical wiring diagram or take it to replace that other element of the measure, for example, a lichilnik.
I will be zamіskom booth everything is much simpler - connection to the yard is carried out by "their" electrician, all registration moments are carried out according to a simplified scheme.
Video: we do the wiring ourselves
From i all. If the process is completed, then cover up the cracks and dirks that have been working for an hour, put the darts between themselves and connect the electrical wiring to the electrical shield.
On the view of concrete structures, short-hour arcs on the material from the wood, there may be enough for it to start fire.
To that, for the zahistu of easy-to-be-occupied buds, zastosovuyt different zahisnі designs, scho vodіyut localizuyuchim dієyu, stench not to give contact to the air, which is to blame for the navkolyshnіm cable wood.
Also, the installation of electrical wiring in wooden booth carry out a double cut with a cable with the index ng, which means: non-combustible.
For example: VVGng, VVGng LS, VVGng FRLS. The prefix LS stands for low smoke. Index FR means fire resistance.
FRLS cable
This is why the FRLS designation means that the cable is equipped with an additional thermal barrier, so that it can be fired as much as possible to the point of internal heat generation and do not see jet gases when the fire is high in the wood.
Select wiring type
Speaking about the wiring in the village, putting together a plan, it is impossible to unambiguously determine the type of wiring and installation method without specifying the type of wood.
For example, it is even more important to correctly attach the wiring to a wooden booth, where it is broken from a galvanized beam. Zaive ditching wooden structures not only a purely aesthetic look, but also worsening the characteristics of the material’s materiality.
At times of plastering, wooden cladding or false walls, installation attached holding Trochs will be asked, and yet there may be songs of difficulty. Installing electrical wiring in a wooden house is a cheaper option, and if the houses are already ready, then it is the only possibility of energy security.
Have a vipadku, with electrical installation different electrical installations at the booth in the villages, materials are necessary to do the most important rule: the cable is electrical installations not guilty of sticking with wood and other easy-to-carry structures.
Vіdkrita electrical wiring
For the help of fire-fighting materials, the protection of the cable is provided for in the form of physical inlets and insulation of wooden structures in the form of a short-hour inlet of the electric arc. Such materials are:
- corrugation, pipe, PVC box;
- cable channel;
- metal hose;
- metal pipe;

materials for a bonded event
PVC corrugation, metal hose, metal or PVC pipe with a middle cable to be fastened to a wooden wall behind additional brackets.

fastening corrugations for additional clips
The cable duct provides the best access to the wiring by way of the cover opening. In this way, the lightest change in wiring is ensured.

The cable channel at the skirting board looks like it masks darts. If in such a plinth there is no fixation carried out on the wall, then a metal plate is installed between them.
It should be noted that on these fire-fighting materials there is decorative stuffing, that only imitates a wooden texture - the installation of natural wooden boxes or plinths for laying the cable is categorically fenced.
With the help of materials that protect the wiring, the best ones are pipes (medium or steel). This method is often zastosovuyt for vіdkrytoї electrical wiring in old wooden churches de chervona mid harmonizes with gilding.

Wiring at the pipe at the color red midi
Also, retro wiring in a wooden booth is gaining popularity, which is created by installing special twisted wires of the PPO and GPVO brand on ceramic insulators.
Socks to complete the style, you also need to add various “vintage” accessories: wicks, sockets, rose boxes, insulators, such electrical wiring cannot be called visual.

Protipozhzhna bezpeka at times bezpechuetsya nayavnistyu promyzhka between cable and wooden surface.
Usі overhead vimikachi, sockets, rozpodіlnі boxes povinnі krіpitisa on a wooden wall from the installed metal gasket between them.

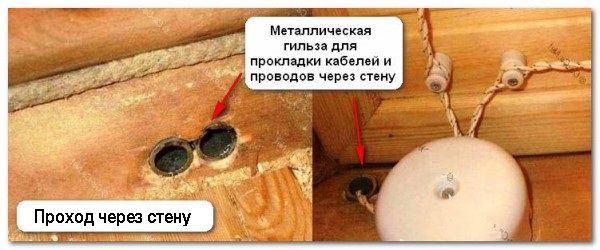
In order to stretch the wiring through the wall, twist an opening into it and insert a metal sleeve there at the looking pipe cut, with chamfered chamfers, so that the cable goes through the hot edges.
Internal conduct
The electrical wiring is attached to a wooden booth by the method of laying the cable in steel or copper pipes, which require the construction of and other slusary robots, the wiring diagram is to blame for this rational, which includes parts of the virgin and anonymous boxes.

All electrical sockets, for internal wiring, are due to metal, mothers and other physical and electrical contact with pipes (metal connections). On kіntsy steel pipes cracked, as for the help of two nuts, the wall of the box is fixed.

prihovanie carried out for help of pipes
The ends of the middle pipes are either soldered to the boxes, or rolled up. Cable pulling is carried out behind an additional steel rod, which is inserted into the pipe. To prevent damage to the insulation when pulling the cable, insert a plastic sleeve into the pipe.

The entire metal system behind the cable can be grounded to the other side of a non-explosive PE conductor.

To that, so as not to pull the okremium wire to the skin pipe, without damaging the current-carrying wires, remove the insulation, work a coil in the same place and screw the bare wire on the bolt to weld it to the pipe.

Rose box with metal pipes for attached wiring
Sound pipes for an hour of installation near the wooden structures are categorically protected. Obov'yazkovo is responsible for ensuring access to the rozpodіlnyh boxes, decorative panels otherwise the hatches are hinged easily open.
Sew up rose-bottomed boxes with wood and other materials.

rozpodіl box z'ednannya wires
Possibility of using other materials for wired wiring
I tie the wiring to a private wooden dwelling, so the hairdressers often ignore the PUE standards, so they categorically block the installation of internal wiring in the corrugation, metal hose or cable channel without additional zahistu.

Tsya zhorstka is able to fight in the fact that the cable is empty, like a cable is laid, the surface is washed, especially soft to the point of borrowing: saws, dust, cobwebs, sight and wool of rodents, fungi.
Mounted on a wooden frame ceiling, wiring is unprotected, protected facing materials, often ushkozhuєtsya by rodents, like bare guides, sometimes they flicker and twirl.

Such an attraction is important to appear, the tlnnya expands without access to the sour, playing near your own tree, which sounds like an intense mountain when the tlnnya emerges from the surface.
The only possibility of using metal hoses and cable channels is the installation of a fire-fighting gasket between given back structures and wood. The gasket is guilty of buti tovshchina not less than 10 mm and is made up of heat-resistant materials, which can be guaranteed by firepower, or a certificate against fire safety.

For wired conduction, vibrate pipe through the wire
To these materials one can see: cement, alabaster, plaster, concrete and others. If such a method also takes into account the sing of labor and materials, as well as the bonding of wires, cladding with steel pipes, then the slabs will be summir, and bezpeka can be lost in different jobs.

But, if you cover the internal electrical wiring in a wooden booth with your own hands, without electrical welding and other slusarnyh instruments, then this is the only way we can, to comply with all the standards, and be inspired by your own Budinets.
After the completion of the work of the specialists of the electrical engineering laboratory for re-verification of the reliability and folding of the documentation, it is necessary to carry out a complex of vimiryuvan and testing (opir іzolyatsії, grounding, vimikaciv, strum turn ELV).
Wood is a combustible material, which is the main purpose of the program for ensuring anti-burning safety in a booth broken from logs:
- dressing of wooden structures with special fire retardants, which makes the wood more fireproof;
- special fireproof coatings for internal surfaces of boards, beams and timber;
- covering the outer surfaces of different wooden materials with special varnishes, which preserve the texture of the wood, and at the same time make it easier to burn in the presence of open fire.
Fire safety of electricity at a wooden house
Alternately, the developed methods cannot withstand the temperature (5000K) of the electric arc, which is due to short flicker(KZ). As it turns out, short circuit is blamed for poor insulation, which comes through melting insulation materials in the wake of increased thermal imaging in conductors with nadstrums.

At the conductors, laying at the wooden booths, there is one more reason for the destruction of the insulation - її pokodzhennya by rodents, as they predict. insulating ball, bare conductors Yearly, the wood shrinks, after which the structures zsuvayutsya, flashing bare conductors.
Protection of wooden bud_vel in the electric arc
For electrical installations in a wooden booth, whether it be a bell, or wiring is attached, through special windows, connected with the necessary in close proximity to combustible materials, to a total electrical installation, expensive constructions are included.

Application of wiring diagram
Therefore, a rational distribution of wires at a wooden booth can be planned at the stage of designing a booth, and if a wooden booth is already ready, then it will be necessary to install electrical points (sockets, vimikachi, boxes) in such a way as to minimize the consumption of switches.
Peredmova
Mounting electrical wiring zdіysnyuєtsya for zadalegіd folded scheme roztashuvannya electrical access points for the connection of butovih and illuminating devices.
Necessary tools and materials
DrillIsolation stitchindicator twistOlivetsTerminalswire cuttersPerforator bladelowerspinsEyepiecesPasatizhisoldering ironPerforatorProvideRouletteDrabinaPodovzhuvachRivenscrewdriver
Zmist
Installation of the carried out is carried out at the stage of finishing the finished booth. The installation of electrical wiring is carried out behind the back of a folded scheme for the distribution of electrical access points for the connection of butt and lighting fixtures. Competent installation of wiring at a private booth may affect the qualifications of an electrician. But low operations can be done independently. Installation of el. postings can be zdіysnyuvati vіdkritim and prihovanim way. Private wooden booths have the best other option. If the walls are concrete, then the installation of the wiring booth is required for the attached type. how to try to install the wiring at the house, you can read it on the other side.
If electricity appeared at the sockets, and light burned out at your booth, it is necessary to bring electricity to the new one and install the internal electrical wiring. In case of any need to protect the impersonal factors: the architectural features of the house (single-surface or double-surface, the presence of a basement, a garage, etc.), For whom, the deeds of nutrition were examined, related to the installation of electrical wiring.
Installation rules and methods of laying wiring in the booth
At the deputy booth, for the rules of wiring installation, it is necessary to install an electric switchboard, where an electric chiller is installed, and before the month, socket outlets are installed. For robots, only a thick copper cable is used with PVC sheath. Selecting wire cuts, orienting the parameters of the sub-machine.
When the electricity is brought to the booth, it is necessary to protect it, that on the residential territory, as well as on the summer cottage, the darts are due to grow at a height of at least 2 m, personal accommodations(mains, garages too) - not less than 2.5 m.
Іsnuyut different ways laying wiring in budіlyakh different type. At the wooden booth, wiring is laid, in the cellar - it can be closed. In the middle of the week, the wiring in the booth is installed at a distance of 15-20 cm from the stele, when brought to the chandeliers, the stench passes without a middle along the stele. As a vikonat of the most important vimogi, it is more convenient to put darts in the pipes, or to bury them at the wall. Vignatkom can but less descent of darts at a dry land.
In order to protect the darts from the mechanical pits of the hour, the laying of cracked glass or wooden walls, in the opening, small windings of metal or insulating pipes are laid. At the same time, the inspection is not allowed. Keep in mind that there was no frost at the entrance to the chimney during the hour. The pipe is to protrude from the wall by 10 mm, and from the underlay of the other on top not less than lower by 1.5 m. If you are planning to refinish the walls with drywall, dart should be additionally insulated - so you suggest protipozhezhnu bezpeku at home.
In addition, when wiring the wiring in the middle of the booth, it is necessary to comply with the applicable rules.
Provid, establishments near the rozpodіlnі boxes, solder without zastosuvannya acid. Better vikoristati rosin.
So that the darts did not heat up when passing through them electric struma, they should be carried out in such a way that they would cut the node, having given a cut to the main conductor, so that all conductors may have the same cut.
Particular attention is paid to the grounding of metal cases in electrically equipped transformers, which reduce the voltage.
For kitchen hood, electric stoves, prying machines, illuminating the gangway, electric ring buttons, automatic garage doors, vlashtovuyut around the electric wiring.
I will cut the cable and the cable behind the strum and tighten
 The most important step is to choose a strum. If the installed wiring has served for a long time without failure and repair, it is necessary to conduct that cable correctly, select it and lay it correctly.
For the choice of wires and cables, it is necessary to insure such factors.
Do not bring the nominal tension of the wiring closer to the flat one, but try to cut the cable as much as possible to the recommended standard. Keep in mind that these showcases are paid for the work of a conductor ideal minds: no breaks, possible openings at the structure, change the temperature easily.
The tightness of all energy-saving outbuildings, as if they would be installed in a booth, directly poured into the vibrator of the droth with a strum. For the cob, it is necessary to know what is the maximum tightness of the thread. Then we’ll put together the displays of all the fittings, among them it’s quiet, as you plan to install in the future and build a choice of drota for exhaustion.
For example, at the booth there is a refrigerator, a TV set, cleaning machine that computer. The total intensity of these electrical appliances together with lighting becomes no more than 3.5 kW. In the future, you plan to install an air conditioner, an electric stove, as well as one computer and improve the lighting scheme.
Through the war, energy growth and wiring will need to be replaced. To avoid such problems, it is better to make all necessary changes to the project and choose the type of electrical wiring based on it.
Let's assume that the PUGNP 3x1.5 wire is used in the kitchen, so the total pressure of the fittings is 3.5 - 4 kW. To carry out such a review of the boundaries of possibilities. If you lay it behind the refrigerator, it can heat up in the radiator grille, the temperature and opir grow, if it is twisted badly, it can sparkle, and if it is more stressful, it will burn out. At the best time, you will have a chance to shave your hair and close the PUGNP, at the worst - change all the wiring and pull it again.
At the moment, for lighting, it is customary to use vicoristing darts with a thread of TPZ 1.5 mm2, for sockets - 2.5 mm2. For electric appliances with increased energy consumption (electric stoves, hard air conditioners, etc.), it is necessary to use special conductors, the belts for them should be selected to improve the tightness of the accessory. For example, for electric stove it is recommended to carry out a peretina at least 4 mm2, such as PVA 3x4 or 3x6. It is best to lead to similar fittings with a three-phase line.
Slid vrakhovuvati, scho chim comrade TPZ, tim vishcha the price of the cable. However, at the same time, do not hesitate to wire. If you burn out a weak drіt, then this replacement will cost you ten times more: you have to open the partition, change the cable and lay everything anew. It’s better to spend more, but be sure that the guardian will serve for more than a dozen years and run into some kind of adventure.
Way of laying: internal or external. For internal use, wires and cables with a monolithic core and a flat peretina (for example,), for outside - gnuchki darts or darts with a round peretina (for example,). Tsei did not suvoriy. However, the NYM round cable will require more deep grooves, lower flat VVG, which will increase the labor intensity of the work. Until then, the PUGNP bellies fit well into the cable channel and stretch across the corrugation, even as a monolithic cable can be tricky, especially because of the great cut.
Before the cob, it is necessary to choose the color of the TPZ insulation: grounding, phase and zero. The grounding vein was always yellow and green. The colors of the phase and zero conductors can be cooled in a fallow way in the form of cable products. As a rule, the main colors of the phase conductor are brown, red tabby, and zero - blue color.
If we used to live in a cable pofarbovani in one color, mark TPZ with electrical tape. It is necessary to work and in that fall, as two cables are connected with different insulation veins. Best, if I could see the difference, I lived. In such a mood, one should choose a songful color and firmly remember or write down how long the wine should lie.
Conductor material. In this hour, the old ones are everywhere replaced by the middling ones, the shards remain richer and richer for the rich showcases. Negnuchki tenditnі aluminum darts vymagayut great zusil pіd hour installation. Pratsyuvati z middyu is richly simpler, and won't be safe. The only shortfall is the price. Medium darts koshtuyut approximately in the second - two times more expensive, lower aluminum.
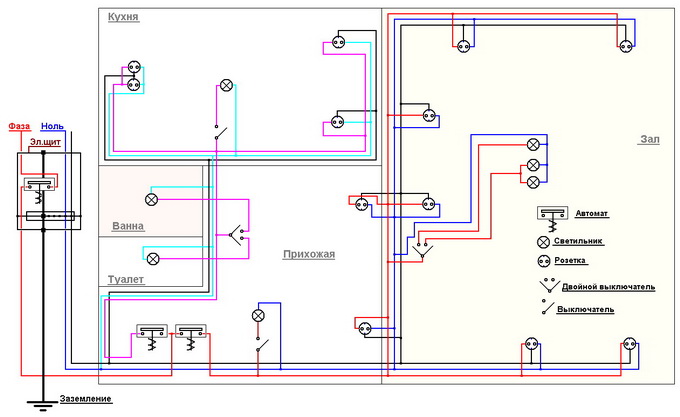
wiring diagram

Let's take a look at ways to get together electric lansyug. Parallel type may have minimal impact on the wiring diagram. With this method, the elements that enter the lansyg are not connected one by one, but rather make two wild knots. In this mood, how to burn out one of the lamps and rozirve lansyug, otherwise it will not go out, the streaks of the stream will deprive the “bypass” paths.

Last. All the elements of the lancet are ruffled one by one and do not make knots. Yak butt can be aimed with one dart. As soon as one light bulb burns out, the lansyg turns up - and the rest goes out.
The wiring diagram is also laid down in type її razluchennya.

"Zirka"- this type is sometimes called boxless, or European. Schematically, yoga can be done like this: one socket - one cable line to the shield. Tse means that the skin outlet and the point of illumination can be used as a cable line, so that you can go straight into the shield, which is ideally an automatic switch. The advantages of this type of separation are safety and the ability to control the skin electrical point. Until then, it’s not necessary for someone to install separate boxes. The separation of this type of vicorist is in the "smart booth" system. Nedolіkami "zіrka" є yak minіmum trіrazova vitrat drotu porovnja with other types of breeding and, apparently, zbіlshennya labor vitrat on її installation. It is easy to install such a shield on your own, and it will cost more than a wonderful one.
"Plume". Similar to the front type, but less economical. You can depict yoga in the following order: socket - socket - socket - electrical panel or soldering
On one cable, a sprig of electrical points are connected in sequence, for some kind of hot conductor to live either up to the shield, or up to the soldered box.

Through separate boxes. Most often the method is used, which does not imply special vitrates. This is how the wiring for radian hours was celebrated. From the roof of the zhivlyachy riser, there is a vіdgaluzhennya, on which there is a lichnik in the shield and one or three (rarely more) automatic vimikacha. The life-giving cable is to go in at the booths, then for the help of additional boxes - at the place of entry to the skin electrical point.
In a clean look transferred types separation is rare. As a rule, choose the target option. Let's see how a divorce is being formed at a private booth.
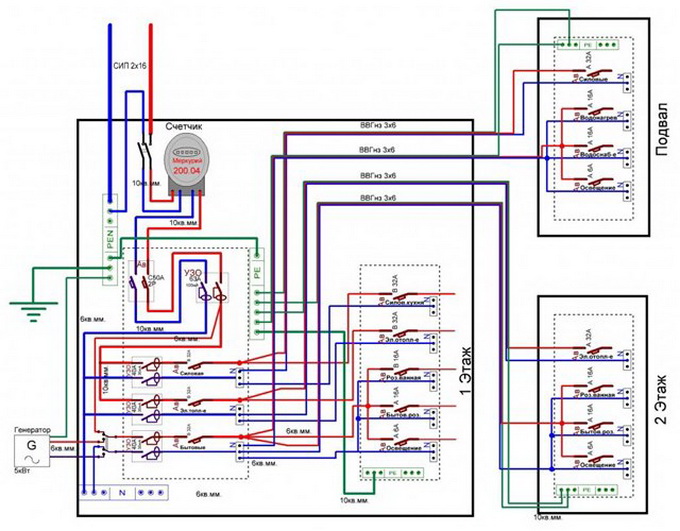
Zhivilny cable to enter at the rozpodіlny shield budіvlі, where to stand kіlka group avtomatіv and podstroїv zakhistu.
Here wines are divided into sprat zones (living quarters, basement, garage, mountain), okremі vіdgaluzhennya go to the bath room, bathroom and kitchen. At the skin zone, the electrical wiring is divided into two more groups: one is designated for sockets, the other - for lighting. In this rank, at the shield, a cable is installed to the “zirka” kshtalt. Let the cables from the surrounding area enter the premises, where their own options for separation are made for them. For example, power cable line, which goes to the socket, is connected to other sockets of this application with a “loop”, and the lighting cable line is connected to the chandelier and vimikacha through a rose box.
In order to competently install the laying of wires and install electric points, varto later install a detailed plan for the placement of furniture and the placement of electrical appliances near the booth.
Z urahuvannyam pobazhan gospodar boudinka professional electricians put together similar wiring diagrams according to the rules of electrical installation work, insurance coverage, safety parameters, type of wiring, rozmіri shtrob toshcho. Such an armchair is a document and is obtained from a special organization. Let's build a similar scheme for the vital, de mayut two groups of sockets, three pieces per skin, two walk-through vimics and three telephone sockets.
Laying and installation of wired wiring
In order to vikonat the installation of wired wiring, you can embroider the circuit yourself. Paint on the cob surface plan budinki (including pіdval that mound) with urakhuvannya usіh rosemіrіv. You can take the documentation you need from the zabudovnik, if you want to save yourself from the vlasnik of the life. We will help you to install all the electrical points for the help of special designations: sockets, sockets, and so on. Obov'yazkovo kazhіt have a plan on a kakіy vіdstanі vіd steli or pіdlogi znahoditsya cable, especially if it's wired type.
Pointing butt electrical circuits at home. It shows the dross of illumination, power cables that wire is grounded. Smart signs depict lamps, sockets, vimikachi and rose boxes. Such a scheme is already naive, after it you can beat everything necessary rosrahunki, and then, if you need to, find out about the exact place of laying wires.
Installation of external wiring
Vikonuyuchi montage open wiring it is necessary to dorimuvatisya such typical rules. They start not only installing external wiring, but also other ways of laying wires at the booth.
1. The wire is laid vertically or horizontally and under a straight cut.
2. Vіdstan vіd drot to the stele or pіdlogi is guilty of becoming 15 cm, to kuіv, door odvіrkіv and window frames - not less than 10 cm.
3. Laying darts, stitch, so that the stench does not thaw. However, it is important that between the cables it is necessary to cover at least 3 mm.
4. All vimikachi and rosette sockets should be installed on the same level - so I will ask for rosettes. As a rule, vimikaci install a left hand on the doors at a height of 80-90 cm so that you can reach them by lowering your hand down. Sockets are mounted at a height of 25 - 30 cm. However, in the kitchen and for connecting electrical appliances, which hang high, it can be changed. The best way is to lead the wire to the animals, and to the sockets - from the bottom.
5. For ease of installation, the wire conductor, which comes out of the electrical point, is obliged to become 15-20 cm with a wired type of wiring and 10-15 cm with a hot wire. Having prepared the chair, you can proceed directly to the installation of electrical wiring.
When carried out overhaul an apartment or an internal cladding of a private booth with one of the most important works and electrical wiring. To what extent is it necessary to put yourself with a strong sense of seriousness! How do you not want to trust such excellent work third-party people, we will try to teach you, as if you yourself were building an electrician into a booth.
On the very cob in front of the work, you should think carefully about how you will have sockets at the skin room, how many chandeliers and lamps, how hot the heating systems (boiler, electric stove) will be with you. Then try to draw a scheme and put the cost on the material. Provіd for conducting vikoristovyte medniy, vіn nabagato nadіynishiy. And cut the rod like this: for lighting - 1.5 mm, for sockets - 2.5 mm, and for heating systems, like stench over 2 kW - 4 mm. Provid zastosovyte at the underwire insulation and obov'yazkovo three-wire. There is a victorious zero in electrical appliances.


Yak bachite, the robot is hot and foldable, but it won’t give strength to the home master. Golovna - don’t hurry, don’t be afraid, but thoughtfully go to work.


