How to connect a three-wire wire to the machine. Like a comb of automatic machines
For many less, far away from the private sector, it is widely stagnant (and dosi zastosovuєtsya). They installed yoga and like an automatic machine and on the okremі elektropryymachi - electric boilers, electric motors, etc.
But the hours are changing, and modern modular automatic machines have come to change. At this article, I’ll tell you how I changed the AP-50 to and installed it.
The path of the windmill is repaired for a thousand miles from the first crock, and for me the robot is repaired from the removal of the AP-50 cover)))
After that, as the cover was taken, it was changed again, that the power contacts of the machine were opened and only after that it was possible to twist the cable from the lower clamps of the machine.
Otzhe, cable, scho to enter, vdchepleny, vіdsuvaєmo yogo trohi in the bіk scho would not be confused. I’m trying to get it once again, don’t chip it, don’t bend it, aluminum cable, double bend it, you can get angry ...
Having installed on a din-rail at the shield a modular two-pole automatic machine for 32A of the company EKF. Bipolar to that which would not be installed zero bus at the shield at 220V, otherwise we’ll get confused at the shield in the shape of a dart with mists and will be on the zero bus-phase ...
On the back, gently wind up the zero conductor of the introductory cable on the upper contact of the machine, in the front, having maximally loosened the terminal of the machine that the wire “went out” without problems.
Before connecting the phase wire, I do a little "preparation" for the robot-shards of the phase conductors at the cable, so that I can fix them with myself and put on them a piece of a PVC pipe. Once upon a time, I lived "killed not free")))
Now everything is ready before the connection of the phase wire under the voltage. So I’ll loosen the contact clamp of the machine as much as possible and correctly, respectfully and carefully “wind up” the wire to the upper contact and not letting it in, priming it with my hand, twisting the clamp with a twist.
carefully input cable move to the right behind the machine to close the cover of the shield.
I put the lid on the plate, I screw up the screws, I sign the automaton, which is supposed to be the connection.
Be the first to know about new materials for the site!
Today, I present to your respect the chergovu statu of the certified electrician-practitioner Sergiy Panagushin from the city of Izhevsk. Before the speech, Sergiy had recently born a syn-you can privatize)))
Sergiy has already shared his practical knowledge of electrical installation on my website, recently I published his articleі
How many times Sergiy rozpovіst how to connect in separate shields of switching devices - for the help of a special comb or self-contained jumpers mounting dart, as well as the ability to connect a zero bus. Father, I give the floor to Sergiy Panagushin.
Hello shanovni readers. Today, I would like to share with you the confirmation of the connection at the shields of the various switching devices(nadali KA) (On the butt of modular automatic machines VA 47-63 type EKF and zero busbar on the insulator under the din-rail from the company IEK).
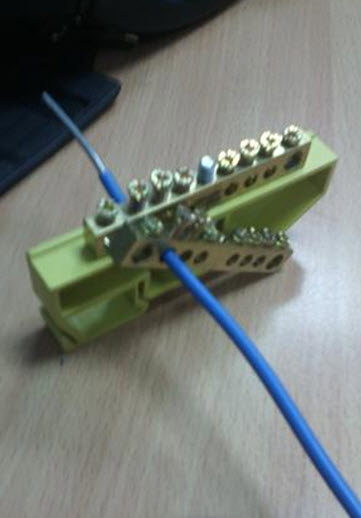
And so the simplest and most massive zastosovuvaniya way to connect KA tse successful bus in the people "grebіntsya". You look like this:
It is made up of a brass plate and an insulator made of plastic:
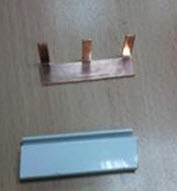
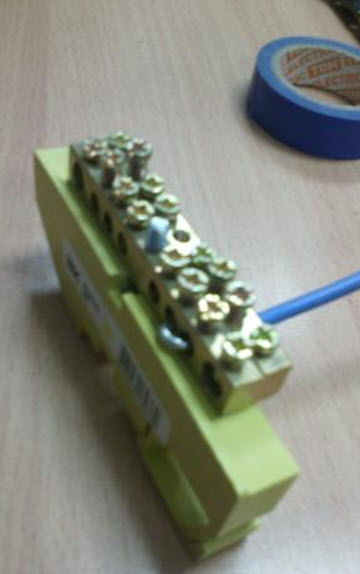
Wanting to know how much this plastic is really an insulator, I honestly don’t seem to know. Ale, I’ll wind it up additionally with this comb with electrical tape.
In the wrapping with electrical tape, I will repeat the following two numbers:
- The comb does not come out of the plastic insulator.
- From the ends singly do not wash the bare combs, which are under tension.
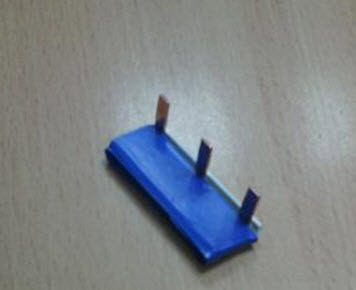
I have such an option for me in the power shield more, I think it’s quiet, who in the whole shield is useful, if I will power the same. So, really, there are end caps for such combs. Ale, in the stores, I didn’t try to sell them for free. Connecting a spacecraft with such a rower at the shield is easy and simple. But here there are small thin ones. It is necessary to install the comb in such a rank as in the photo:
Conducted between the comb and the lower pressure plate of the spacecraft, so the ledge from the insulated plastic must be directed to the machine's screws. Shards in the photo are higher.
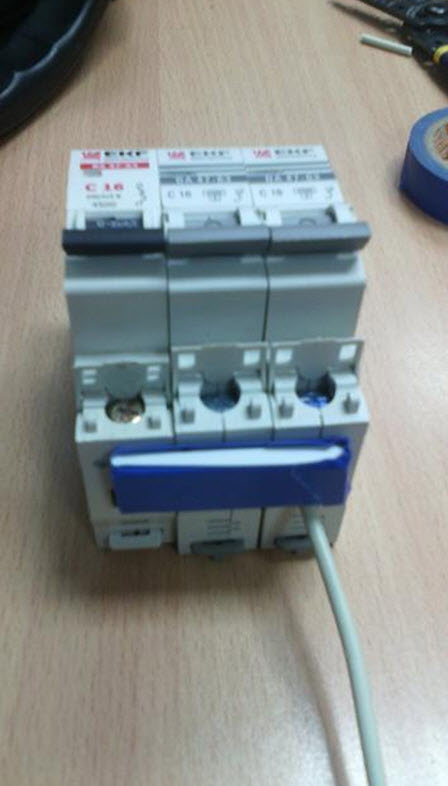
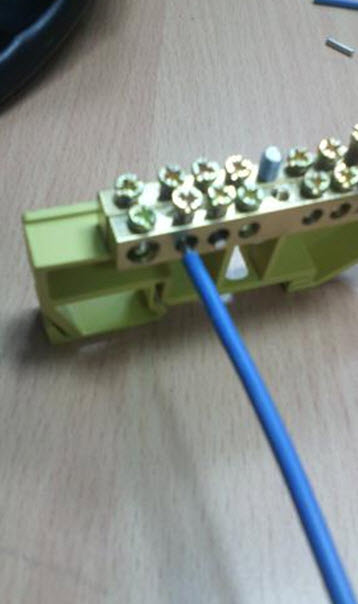
If you want to turn around, then you can’t get out of the garne z'ednannya and even if it is automatically fixed on the din-rail that cowpea is provided. In the photo below, the automatics were not fixed with a din-rail, which led to the automatic. Ta th old look such a connection does not look pretty:

It’s a pity that such combs are sold in bundles of a meter for a long time, and if you need to install 2-3 automatic machines, then there is no way to bathe such a comb of special sensation.
But there is another option to prepare such a comb independently from the dart. How to make a comber with a bagatodirodny rod of the brand PV3, I will tell you about it, at the article about crimping wires with tips of various types NShVI, NKI, etc. And the axis z of a monofilament dart to make a comb as a whole is real and not so easy.
It is sufficient to take a single-wire wire for the butt, taking APV1 * 4 so aluminum wire, not a bonnet, on my robot in the sphere of ZhKG mi yogo is even richer vikoristovuemo for repair robots.
So let's turn to our rams, tobto grebіntsіv.
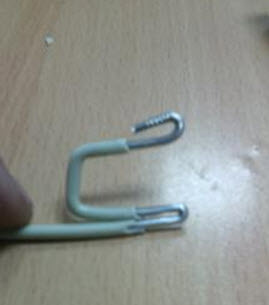
What are we doing. We make a pass at the end, at the two depths of the entrance to the spacecraft and fold it to the hits with a loop and squeeze it with pasatizh, after which we don’t tell you about it, we wrap it with the letter P and in the other side we see the isolation with a knife on the photo neatly like:

If we introduce excess insulation into the dart and see it with the knife itself:
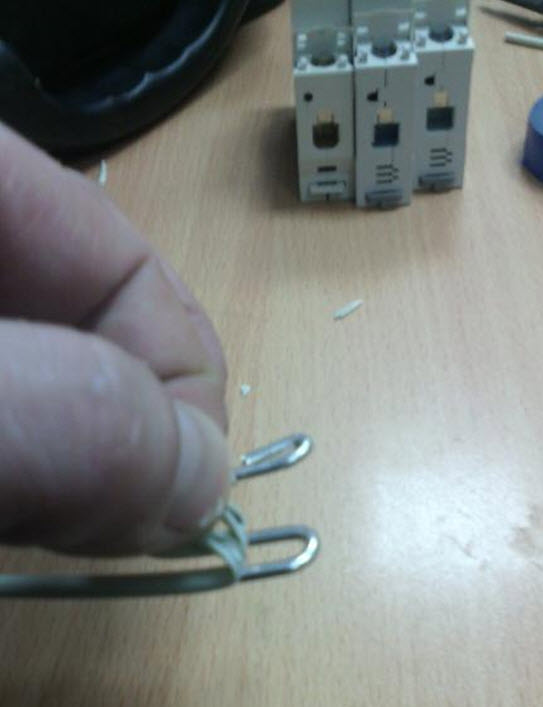
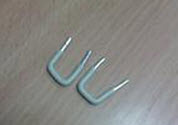
Well, in essence, we are preparing a comb for two spacecraft with the same “makaram” robimo and for three spacecraft and for a larger number of tech is possible.
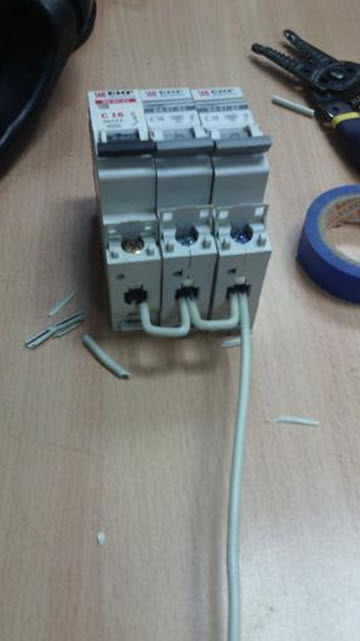
And don’t think of robiti jumpers between automata axis in such a rank as in the photo below:
As practice has shown, in a day's time such jumpers are repaired and warmed up, and the cleats of the KA are closed.
Well, how can I connect the SC to you, now I’ll tell you how to connect the darts to the zero tavern. The last contact is guilty of buti in the mist of the connection of the main or lively (to whom it should be) zero dart to the tavern.
And so we need not one shank, but two and one insulator (my preference is for DIN-rail).
We just take and clean up more so that we have rounded the two tires of the doors. Vіdkruchuєmo pritisknі gvinty i zavodim direct provіd through two open on the tavern yak in the photo:
We cleaned up the plot with a shack so that we could start clearing the plots for all 4 gvinti of both taverns.
Axis so, schob vin zayshov:
Contact with such a connection is increased by 4 times on the connection point of the main zero door. Now at the skin opening on the wires that come in, you will have wires pressed not by one, but by two screws and you will have two more contact areas. What is a huge plus.
I’m more confident that the article will be familiar to you and I’m more confident that it will make you understand.
With honor Sergiy Panagushin.
Well, at the end of the video, Sergiy Panagushin:
I will be glad to your comments, as if it’s technical food, then I ask you to put it on the forum, I myself confirm it on food .
Subscribe to my channel on YouTube !
Fresh video from the channel "Follow the electrician":
See more videos of electricians for the home!
Be the first to know about the news to the site!
After that, it is necessary to connect the yogo vibrating machine. Connection of automatic speakersє do not fold the tasks and give strength to the skin.
Automatic switches are installed in electrical panels. For a superficial fixation of the machine in the electrical panel, put it on a special din-rail. Provid in the contact clamps of the machine is fixed for additional bolted contacts.
Under the hour of installation in electrical panels and connected lines, to live or enter, it is necessary to tighten the bolt contacts carefully, without overhead wires. The tightening of the contacts is not due to the deformation of the machine body, the shards can cause damage to the position of the jet-conducting parts in the middle of the machine body, which can cause an over-the-world overheating of the machine and the way out of the fret with insignificant pressures.
At connection of the machine it is necessary to follow the arbitrarily accepted rule: the top of the automaton is connected to the entrance (life), and the bottom is connected to the exit (navantage). At the future, if you need to replace it, or connect to a working automatic machine of additional wires, you know, to some contact, that life is connected.
Before connecting, the cable lived to the zatiskachіv of the machine from the new one, the insulation layer is 10-15 cm, after which the cable becomes more flexible and easily bends in the middle of the electrical panel. Tse simplifies the installation, especially when a lot of automatics are installed in the shield. Far from the darts, the internal insulation is approximately 5-10mm. For the necessary connection to the machine, wires of a small cut or bagatose drotu bagzhano zastosovuvaty special tips.
De zastosovuyutsya and how to connect one-, two-, three-and chotiripoleusnі automatic machines.
AT alone phase meshes a voltage of 220 for the installation of electrical appliances, as a rule, one-pole or two-pole automatics are installed. Up to single-pole automatic wimicach only phase wires are connected - L. To bipolar wires, wires are connected, phase wires are connected - L i zero wire– N.
The tripoles are automatically switched in 3-phase lines. Three phases of the live power supply L1, L2, L3 are connected to the shutdown of such automatic devices.


