Heat supply of electrical installations. Rozdil heating elements and vozlіv control. Pokrokov's instruction for the installation of ETP.
The use of electrical heating pads is more relevant in bathrooms for swedish pidgriv. ceramic tiles, heated loggias, verandahs or a damp place in the Crimea, such a decision is made to go as an addition to the main radiator scorching.
Electrical sub-logs can be installed in apartments, but there is no way to install them. Ease of installation and options available for sale allow you to easily install electric heat and power with your own hands.
As a matter of fact, before you there is more food for choosing the type of warm weather.
Methods for installing electrical heat inputs
Variants of installations of electrical heating and logs can be discussed:
- Mounting in a screed ball, after which the cover is laid for the underlay;
- Laying heat pads on top of the screed under the tile;
- Laying without intermediary pіd pіdlogovo pokrittya (pіvkova pіdloga).
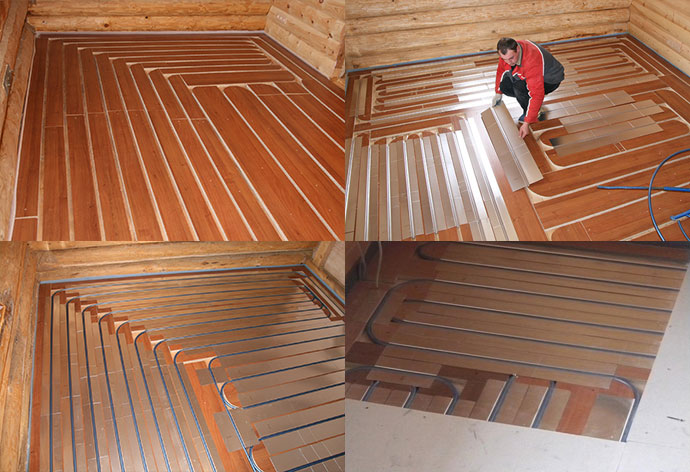
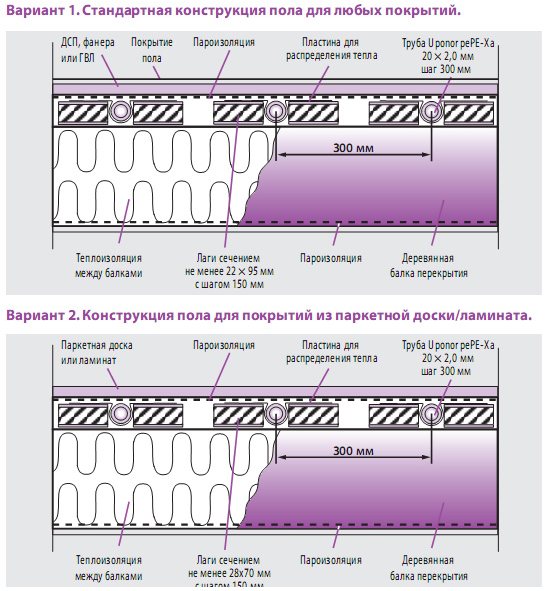
The first option is suitable for heating in living rooms, bathrooms, kitchens, loggias. When tsimu maєtsya on uvazі installed cable warm underlay. Under the system itself, waterproofing and a ball of insulation are installed. A small ball of screed is formed at the top.
If there is an insulated place on top of the bottom, then you can lay the heat under the tile without an additional heat insulation ball and install it in the screed. A ball of tile glue and the tile itself protect the heating elements. However, the following should be specified in the instructions for choosing what to buy, about the possibility of such installation.
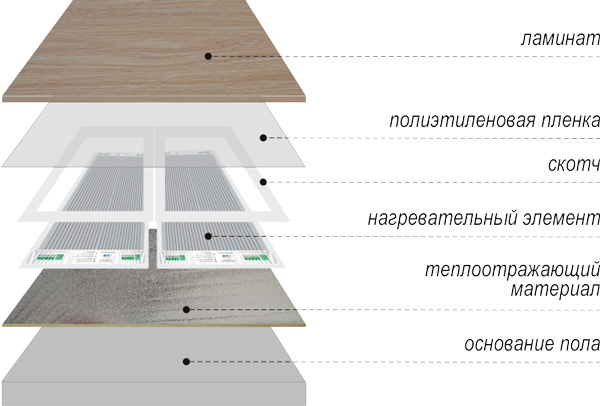
It is also necessary to install a heating pad under a laminate or linoleum, and there is no need to carry out capital work, tied from the replacement of the screed, then the best heat is the electric subdogue for the whole - plivkov (infrachervona). In this case, the ball of insulation is laid in a look of spinned polyethylene with a foil surface on top of a visible screed. Dali - electrical elements. If necessary, add a ball of waterproofing and without intermediary cover.
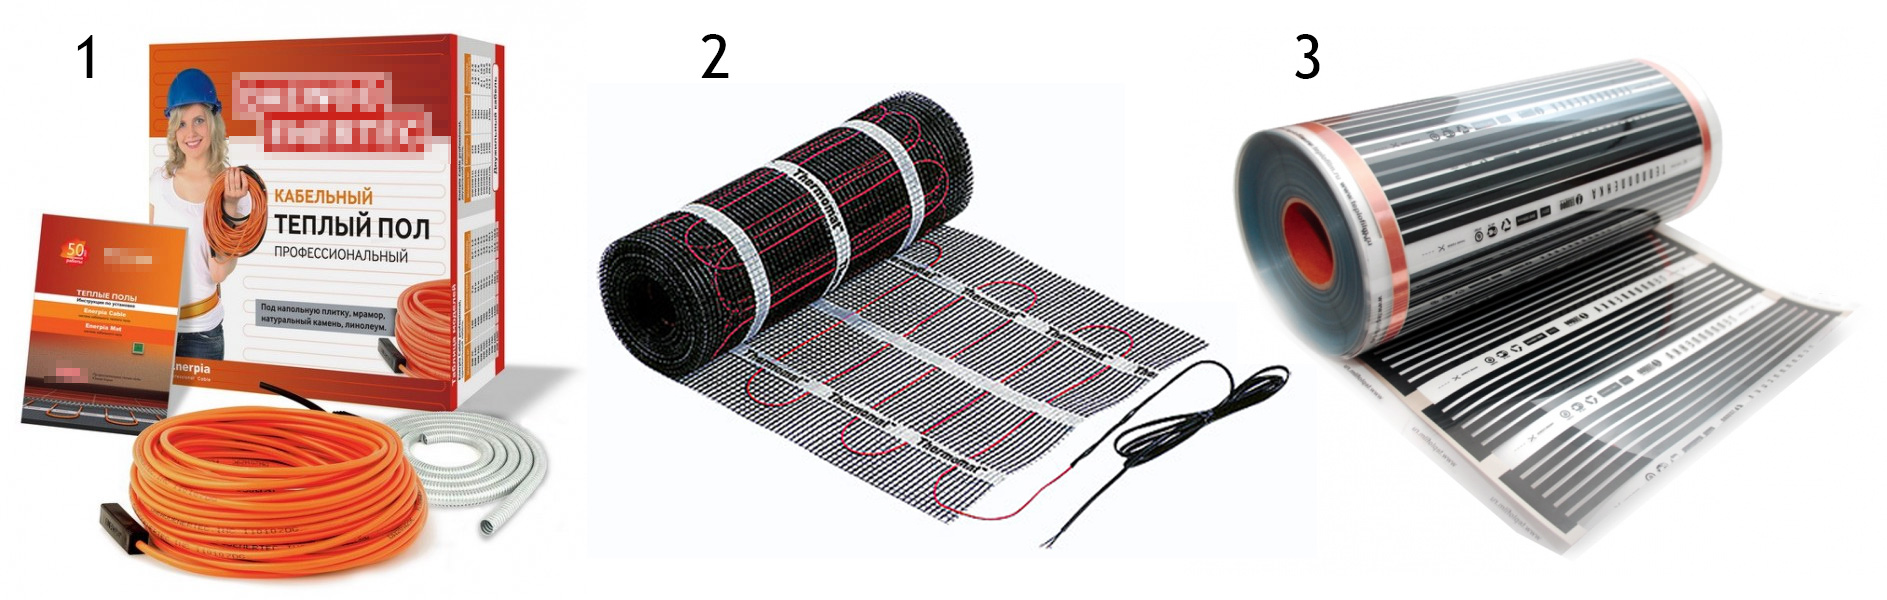
See electric warm signs:
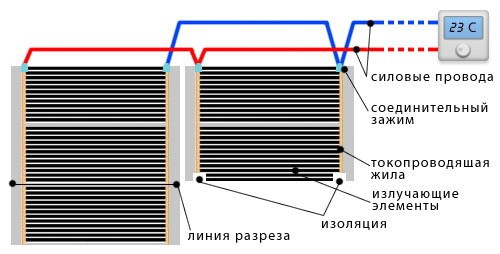
1 - Cable; 2 - Cable with reinforced mesh; 3 - Plivkovy (іnfrachervony).
Important: It is not possible to beat the pleated heat under the tile under the tile, as it is possible to install it in the screed.
What do you need for a robot?
Also, for laying the electrical sub-logs, you need the following elements and materials:
- Heat supply system (heating cable, okremo or poednanny іz reinforced mesh);
- Z'ednuvalni darts;
- Kriplennya;
- Regulator; temperature sensor;
- Zakhistu ELV system;
- Medium cable for grounding.
Rozdil heating elements and vozlіv control
On the back, a plan for the installation of heat pads on paper is being created. If so, it is safe that the heating drіt or the smelter is not to be installed in the places where the massive furniture is buttovі attach. At the places where the scorching pipes pass, or else the heat source, so that the buffer zone without heating elements is protected. The price is due to the particularity of the electrical heat supply. At the top of the hydraulic systems, all heating elements of one circuit are heated at the same time, even though it is cold according to the heat output from the furniture without lower legs, or if additional heat is needed, then the elements are overheated and go out of tune. Furniture in any weather can be damaged by overheating.
As a result, the shape is wrong, it is inscribed in a rectangle, which depicts a room. І itself behind the contour of the circle of the figure and in the middle of it, there is an electric heat input.
Zim povyazaniya yakraz the biggest shortfall of the warm state. The rearrangement of furniture can be significant on the practicality of the system.
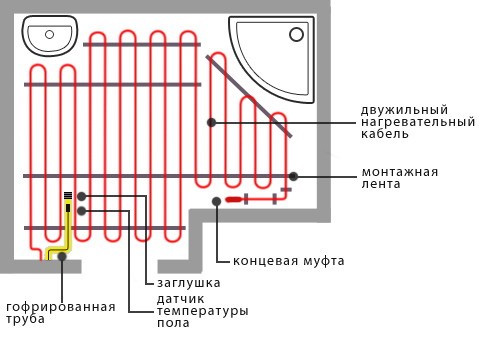
Scheme-butt of laying the electrical system in bathrooms
For different purposes, to create a stench of demarcation symbolically, it is better to form the outer contours of the warm underlays with their own fine regulators and the introduction of life. At the time of pouring, the screeds between them are laid on top of the underlays of the damper line.
If the planning has already been thought out on the paper, you can transfer the layout without intermediary to the next one.
At the handy place on the wall, the position of the heat regulator is indicated. Here pass the opening to the installation box and the gate is lowered to the sublog. After the preparatory work, that planning can be started before the rozrahunka required quantity materials.
Plivkov heat pidloga
Rozrahunok materials
It is possible to use ready-made tables with a selection of cable heat and logs, and with a rozrahunkom of the heat loss of the skin room, the necessary krok of laying the dart and yogo stale dozhina on the premises is selected.
For plіvkovyh (іnfrachervonih) systems, rozrahunki are simpler: follow the number of elements, how to cover the necessary area.
At the rozrahunka, it also includes a wire for connecting the regulator, and a warm connection to the air cooler and the type of regulator without intermediary to the system elements.
Important: Vykoristovuvati for electrical heating is protected by direct connection to the outlet.
Zgіdno with rozrakhunkami and otrimana potuzhnіstyu vsіh warm pіdlog it is necessary to turn over electrical introduction on the possibility of showing such an adventurousness. If the introduction is insufficient, then it will be necessary to replace it and install automatic security guards.
Surface preparation. Features of base insulation
If necessary, the old screed ball will be dismantled again. The entire surface is cleaned.
Further, a ball of waterproofing is laid down from the wall by about 10 cm. A damper line is fixed along the entire perimeter of the underlay on the wall. It is possible to compensate for the thermal expansion of the sublogs for the hour of heating. As a result, it will be possible to cut off excess waterproofing and damper lines.
If the thermal energy did not go down, it is necessary to isolate the basis of the log. The fallow type of heating is applied to the type of surface, as well as the purpose of the straightening of the heating system, to choose the type of insulation:
- If the warmth of the underlay is an addition to the main system of singing, then it is sufficient to vicorize the backs of polyethylene with foil coatings, which are like a lining for the warm underlays (penofol).
- For apartments with singed applications on top of the bottom, put sheets of expanded polystyrene or extruded expanded polystyrene with a thickness of 20 to 50 mm, or another layer of heat insulation.
- If the installation of heat pipes is carried out on a non-flushed earlier loggia or veranda, then a larger ground ball is formed to insulate up to 100 mm of expanded polystyrene or a similar ball of mineral wool.
A reinforcing mesh is laid on top of the insulation. You can do without it, so that the ball of the screed will be thin and enough to add plasticizer and microfiber. (About those, how to form a dry screed with reinforced synthetic fibers -).
Installation process
Before packing the dart, you must check your opir and check with your passport. Approximately 10% of passport data is allowed. Installation of electrical heat pipes can be carried out both from fastening to the reinforced mesh for additional screeds (not tightening), and for additional special fastening lines.
At the time of installation of heat pipes near the bathroom, or near the stairwell, it is necessary to ground the armored mesh under it and provide grounding to the regulator. For whom vicorist ludzheniya medniy drіt. Well, if you need food, why can you put the heat in the bathroom? So, only obov'yazkovo.
Infrachervona of heat of the underlay is simply spread over the ball of insulation. For the technology of the proponated by the vibrator, you may need to fix it with a special adhesive tape or a special wrinkle on a smoothie.
Shari pl_vkovoї p_dlogs p_d hour laying directly p_d laminate.
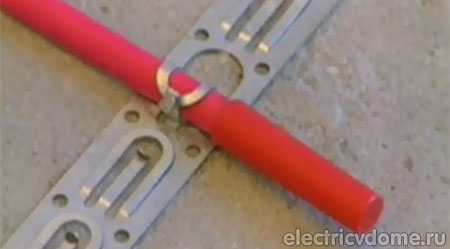
In places, de wired to pass over the split line of two overlapping slabs, it was necessary to bury corrugated pipes at the vents, with a length of 10-15 cm.
The space between the heating cable and the wire of life may be at a distance of 10-15 cm from the strobe so that the closing clips were sunk by the weather at the screed.
Important: Obov'yazkovo indicate the position of the month of construction on the plan of the apartment. Tse mozhe znadobitisa zgod at the time of the immushenogo repair of heat supplies.
If all the elements are placed in their places, once again they are checked against the enemy. Just as soon as there are a few breaths in the wake of the earlier deaths, you can try the heating elements, increasing the warmth of the cold.
A corrugated pipe is lowered from the strobe regulator, the other end of which is placed in the middle between the nearest heating cable. A temperature sensor is inserted inside the corrugated pipe, for the help of which it is possible to regulate the work of the heat supply. Once again, check that the sensor is easily removed and there will be no problems with its replacement.
If everything is fine, then the whole system will start to break down and the regulator will work until all maintenance operations are completed. A heat screed is being formed. After a new hang-up, the robot of the system is re-verified again, and everything is fine, the sub-log is installed. As if the screed is not needed, as in the case with a warm plaid layer, a laminate or linoleum is laid in the same place.
Report on the installation of traditional concrete or cement screeds -.
As you can see, it’s easy to finish the heat with your own hands, and it’s much easier, lower.
Video: laying down simple cable warm laying
Video: cable laying with armor mesh
Video: laying plіvkovoї (іnfrachervonoї) warm
At the same time, a lot of bags of private houses are installed for the main or additional scorching of water heat for use. Vіn mає masu pervag: more comfort, evenly warms up the room, does not require additional energy inputs (scalars are used from one boiler with radiators). The instruction in our article is to allow the installation of a water heating pad, without letting it know. Prote before tsim varto vivchiti usі nuances.
The best heating system for water supply is used for laying tiles.
- First, insulting the materials of mіtsnі and dovgovіchnі.
- In another way, the stench does not see shkidlivy speech when heated.
- Thirdly, add water to the tile (the material itself is cold), and you can walk barefoot on it with a high heat capacity.
Obviously, you can work with heat and, under linoleum, PVC tiles and put on carpet, for the presence of a special sign.
But, for example, carpet heating is not a sensation, and it is impossible to exceed the surface temperature of 31 ° C, according to SNiP 41-01-2003. Otherwise, it provokes seeing shkidlivih speeches.
Installed at the apartment
Without a doubt, the wealthy bagatians blamed the idea of independently connecting “for free” water heating supplies to the system central scorching or GWP. And deyakі navit so shy, but zdebіl tse zabroneno mіstsevim legislature.
For example, in Moscow there was a decree No. 73-PP dated February 8, 2005, in addendum No. 2 it is clearly written about the fence of the re-dominance of the community water supply systems for the power supply of water supplies.
Having violated the rules, in the shortest possible time, you can take a fine at the first inspection of plumbing. And in the naigirshomu - the risk of depriving the susіdіv without scorching.
In some regions, there is no fence, but for the connection it is necessary to carry out an examination, so as not to disrupt the operation of the system.
In general, from a technical point of view, similar options are possible, but even less when connected to an external pumping and mixing unit and a saving vice in the system at the exit.
Get respect! If there is a jet pump (elevator) in a bagatokvartirny booth, then it is not possible to beat metal-plastic and polypropylene pipes.
Ways to install on the sublog
Є k_lka ways to control the heat of the water supply.
- The most popular and least among them is a concrete screed. On the vіdmіnu vіd electrical views, Pipe 16 mm into tile adhesive is not possible, it is not a viide. To this, a screed is poured more than 3 divas above the pipes.
- Another way is to lay pipes near the vir_zan grooves to pіnopolіstyrol. Grooving the grooves by hand, laying the pipes in the middle, then pouring the screed.
- The next option is often vicorous at the booths with a wooden underlay, even if you need great labor - tse laying in a wooden groove. For this purpose, boards are stuffed on the bed, as if they were filling the zholob of the required form for laying.
Vykoristovuvani vidi trumpets
Three types of pipes are required for warm water supply.
- Pipes made of cross-linked polyethylene (PEX-EVOH-PEX) are not handy in robots, so it is important to give them the required shape (when heated, the stench straightens). Then do not be afraid of freezing of the radiators and repairs.
- Metal-plastic pipes - the best option: low price, Easy to assemble, stable shape.
- Mid-trumpets are expensive, when victorious at the tie, it is necessary to close them with a zahisny ball, so as not to allow a puddle infusion.
Rozrahunok warm water supply
Prior to installation, that purchase of materials for footwear and clothing should be done by heating the clothing. For whom to arm the circuit with contours, so that we will become in good fortune during the repair robots know the position of the pipes.
- It’s astonishing that furniture or plumbing will always be in the singing room, they don’t lay pipes here.
- The length of the contour with a diameter of 16 mm is not liable to exceed 100 m (the maximum for 20 mm is 120 m), otherwise the pressure on the system will be ruined. In this rank, the skin contour approximately occupies more than 15 square meters. m.
- The difference between the old number of circuits may be small (less than 15 m), so that all stinks can be equal. Great stones can be divided into sprat contours.
- The optimal laying of the pipes in the warehouse is 15 cm with the best heat insulation. If winter weather is often colder than -20, then the cold will change to 10 divas (it is possible only in the outer walls). And you can’t do without additional radiators at the pivnoch.
- With a laying distance of 15 cm, the length of the pipes should be approximately 6.7 m per skin square of the application, with laying through the skin of 10 cm - 10 m.
The graph shows the deposition of space to the flow in terms of the average temperature of the heat transfer. The dotted line shows the pipes with a diameter of 20 mm, the succulent lines - 16 mm. 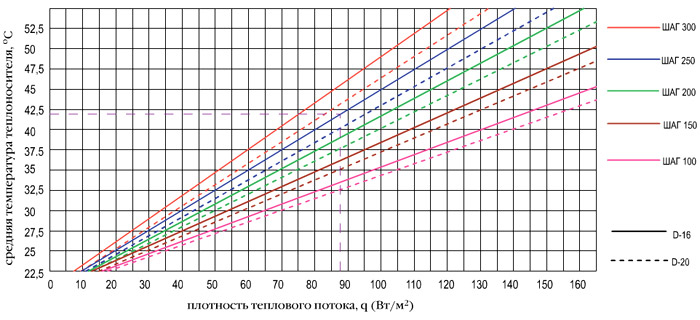
The graphic shows data that is fair only for the choice of a cement-food screed with a total of 7 divs, with tiles covered. If you move the screed together, for example, by 1 cm, then the thickness of the heat flow is reduced by 5-8%.
- To know the width of the flow, the amount of heat consumption of the installation at Watts should be divided into the area of pipe laying (visiting the steps in the walls).
- The average temperature is changed as the average value at the inlet to the circuit and the outlet from the return.
The optimum temperature at the inlet and outlet is not to be blamed for being lower by 5-10 degrees. The maximum heat transfer temperature can be increased to 55°C.
Behind the induced scheme, it is possible to vikonate only a coarse adjustment and more residual adjustment for the adjustment of the adjustment unit and thermostats. For an accurate design of obov'yazkovo go to professional heating engineers.
Pirіg teploї statі
The technology of laying warm water pipes is made up of decals of balls, which are laid at the singing sequence. The thickness of the cake should be 8-14 cm, the need for overlapping is up to 300 kg / sq. m.
As a basis - a concrete slab: 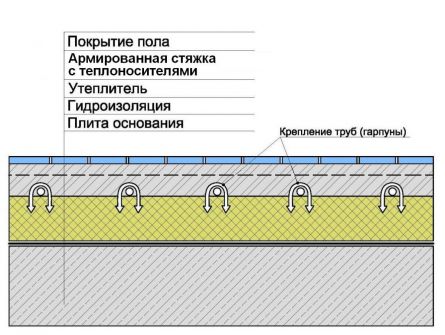
- waterproofing;
- warmer;
- reinforcing mesh;
- water pipe heat pipes;
- coupler.
For waterproofing, it is possible to vicorate a special polyethylene slab or special materials. To dampen the damper line with streaked men with thermal insulation of 1-2 cm, or buy a ready-made option with a self-adhesive base.
Selecting an insulating layer to lay down depending on the number of factors: region, base material. For example, for laying on the ground vicorist and extruding polystyrene foam with a thickness of at least 5 cm (optimally 10), and if there is a warm basement on top of the ground, then you can put in thinner options of 3 cm.
A golovne recognition of a heat insulator is to send heat to the mountaintop and prevent great losses.
Yakshcho pіdstava - pіdloga on the ground: 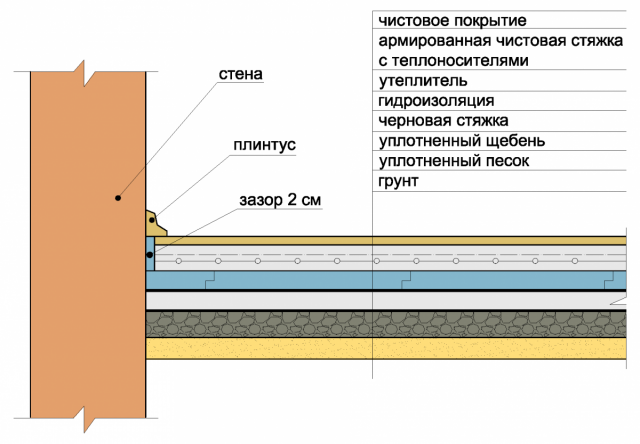
- bulk soil 15 cm;
- crushed stone 10 cm;
- sand 5 cm;
- black constriction;
- waterproofing;
- damper line around the perimeter;
- extrusion pinopolistirol not less than 5 cm;
- reinforced screed with heat transfers.
Preparing the balls under the black screed is importantly tamped ball-by-ball. With a solid tamped base and victorious extruded polystyrene foam, the black screed will not be obov'yazkovo.
Installation of heat supply
It is possible that the garna base has already been prepared: a flat concrete slab or a sizzling ball without strong drops. Falls are not guilty of revisiting 7 mm under the hour of re-verification with a two-meter rail. Yakshcho є nerіvnostі, їх it is possible to sip piskom.
Waterproofing
Some lay the waterproofing under the bottom of the insulation, htos, navpaki, on the mountain, and the deaks vikoristovuyut there and there.
As vykoristovuetsya ekstrudovaniya pіnopolystyrene, vіn practically does not require waterproofing, so the situation is not so critical. Ale won’t let the cement milk penetrate between the seams of the insulation and drink it into the slab and dodatkovo strimuvatim the water from below.
If you close it to the bottom of the insulation, then you can creak pipes on the heat of the underlay until the insulation. If you want to lay a waterproofing on a mountain, then for fixing pipes you need to lay a mounting mesh.
We lay waterproofing with an overlap on the walls by 20 cm and one by one. The sticks are glued together with adhesive tape for sealing.
Damper stitch
If you bought a ready-made stitch - just glue it around the perimeter. You will sound the maє tovshchina 5-8 mm and height 10-15 cm. If the stitch is broken with your own hands, then glue it with a shoe or fasten it with screws to the wall.
Linear expansion of concrete should be 0.5 mm per skin meter when heated to 40°C.
Teplyuvach
The sheet insulation for warm water applications is laid in the place of the sticks, so that the veneers are covered.
Armuvannya
The first ball of the reinforcing mesh is placed on the insulation and vicorist as a basis for fixing the contours and equal distribution of heat on the surface. Mіzh themselves sіtki pov'azyuyut drotom. Pipes are fastened to the grid on nylon clamps.
The diameter of the rods of the mesh should be 4-5 mm, and the size of the room should be laid down in the form of pipe laying for manual fastening.
In addition, it is necessary to lay reinforcement on top of the pipes, so winding it at the bottom will not give any effect, as if it would lie on the very bottom. Abo under the hour of pouring, put the grid on the supports, creating a gap.
Pipe fixing methods
The water heat of the bed can be laid down with a dekilkom in ways that are pererakhuymo їх. 
- Tightening clamp made of polyamide. Vikoristovuyut for fastening of pipes to the mounting grid. Vitrata approximately 2 pieces per 1 m.
- Kripilny drіt zі stalі. It is also vikoristovuyut for installation to the net, vitrata is the same.
- Stapler and fixators. Suitable for fast fixation of pipes to thermal insulation. Vitrata fixators to install 2 pieces per 1 meter.
- Fixing track. Є U-like plank made of PVC, to serve as a basis for laying pipes 16 or 20 mm in it. Zhorstko creak to the point.
- Mothers for warm water pads made of polystyrene. A pipe is laid in the middle of the grooves between the columns.
- Rozpodіlna aluminum plate. Vikoristovuetsya when mounting in wooden pidlogs, it reflects and evenly distributes heat on the surface.
 Zastosuvannya different mind pipe fastening
 pipe laying
The pipes are laid with an opening in the walls of 15-20 cm.
The scheme of laying the heat and the logs is different, for example, a spiral snake. At the outer walls, more often, more often, laying is done, or to draw a contour from the supply of instructions from cold walls. The butt of the scheme for the strengthened support of the ovnishnіh walls of the testimony in the photo, this option is more likely to win in cold regions: 
In other cases, sound the contours of the spiral (raw), this is a universal option.
In places with large piles of pipes, in order to avoid overheating of the surface, part of them are covered with a heat-insulating tube.
Metaloplastik 16 mm and 20 mm can be easily bent by hand, without any special tools. Sob evenly bend the trumpet with a small radius and when it doesn’t let it crack, cut it off at the entrance of the sprat (overhand hands).
At a 90 ° cut, you need about 5-6 overhangs. Tse means, on the back, resting with the great fingers, to shake a small zagin, then the trochs clasp their hands at the side of the vagina and repeat the diy.
The appearance of evil on the pipes at the places of sharp turns is unacceptable.
Polypropylene pipes bend more importantly, more stench springy. To that, for the wigina they heat up or to rob, but in the case of a warm pіdlogu - just krіplyat to the net, the wigini's robs are less sharp.
The installation of the water heating system starts with the connection of the first pipe to to the pink collector, and after laying the kіmnati vіdrazu connect the return line (another end).
Connecting circuits
Most often, the circuits are connected through a separate vuzol. Vіn nese kіlka funktsіy: podvishchennya vice in the system, temperature regulation, equal supply to the kіlka circuits, combination with radiators at the same time.
There are no circuits for connecting to the boiler, we wrote about them in articles about: with manual regulation, with weather automatics, and with automatic regulation for auxiliary servo drives and sensors.  Fitting euroconus
Pipes are connected to the collector for the help of "Evroconus" tight fittings.
denunciation
If you have completed the installation of all circuits, it is necessary to carry out a pneumatic testing of the system for tightness. For which additional compressor a pressure test is carried out. For testing pіdіyde small pobutovy compressor іz vise over 6 bar. The pressure on the system is brought to 4 bar and it is blocked for the whole hour, until the system is started.
The shards of the molecule appear to be richly smaller than water molecules, to reveal a small depressurization. Until then, the water may freeze, if you don’t overtake the scorched switch, but you won’t become anything after repeating it.
Heat screed
Filling the screed is carried out only after the installation of all circuits and hydraulic testing. It is recommended to vicorate concrete not lower than M-300 (B-22.5) with crushed stone with a fraction of 5-20 mm. Minimal Tovshchina 3 cm above the pipe to fight not only for the removal of the necessary minerality, but also for the equal distribution of heat on the surface. Vaga 1 sq. m screed with a tovschinі 5 cm to become up to 125 kg.
When the screed is over 15 cm, or for high navantage, an additional increase in thermal conditions is required.
With an increase in the volume of the screed, it will take more than an hour to heat up to the right temperature after switching on, and the inertia of the system will also increase. The lower the heat conductivity of the screed, the more it is necessary to maintain the heat transfer temperature.
Deformation seams
 Apply the bottom of the great application to the zone Vidsutnist or the position of the temperature gaps is the most common cause ruinuvannya screed.
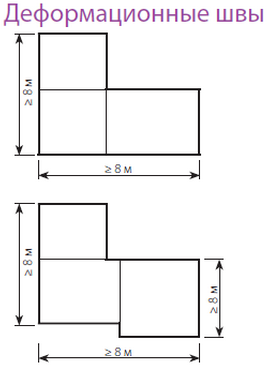
Shrinkage seams should be loosened in such cases:
- application may have an area of over 30 sq. m.;
- walls can be built over 8 m;
- the length and width of the kіmnati differ more nizh at 2 times;
- over deformation seams of structures;
- the application may be too original form.
For this, a damper line is laid along the perimeter of the seams. At the place of the seam, the reinforcing mesh can be divided. The deformation gap is to blame buti in the basis of the torso 10 mm. The upper part is covered with sealant. If the application may have a non-standard form, it is necessary to break it into simple elements of a rectangular or square shape. 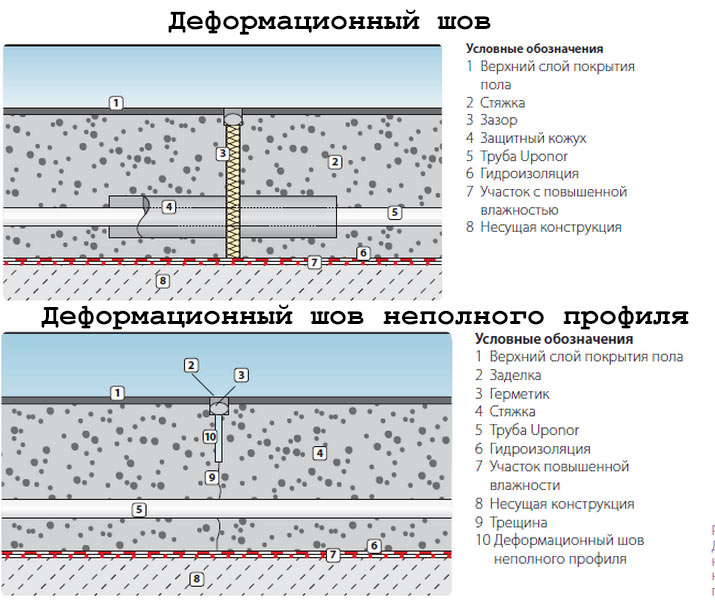
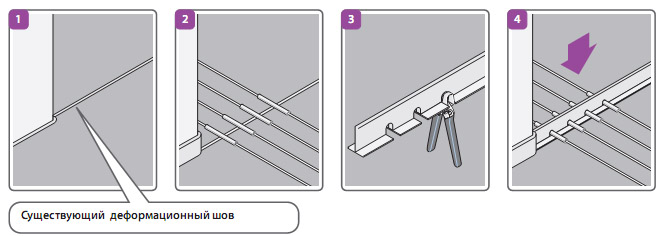
Like pipes to pass through the expansion joints at the screed, at these places they are laid at corrugated pipes, 30 cm corrugations to the skin side (valid up to SP 41-102-98 - 50 cm from the skin side). It is recommended not to split one circuit with expansion joints, supply and return pipes pass through the new one.  Correct passage of contours through technological seams
When laying the tiles on the deformation joints, the possibility of gluing through the expansion of the sum plates is increased. In order to hide one, the first part is laid on the glue, and the other part is attached to the elastic sealant.
For an additional rosette, you can twist the deformation seams of a non-linear profile. Їx to work for help with trowels, for 1/3 of the comrade. After the concrete has been sealed, they are also laid with a sealant. As pipes pass through them, the stench is also protected by the corrugation.
Cracks on the screed
To finish the sight often - appearing on the screed cracks after hanging. You can provoke a number of low reasons:
- low thickness of insulation;
- filthy strengthening of the rozchin;
- presence of plasticizers;
- nadto great tovshchina screeds;
- the presence of comfortable seams;
- nadto shvidke hanging concrete;
- wrong proportions.
Destroying them is even easier:
- insulating material is required to vicorate with a dense thick layer of 35-40 kg/m3;
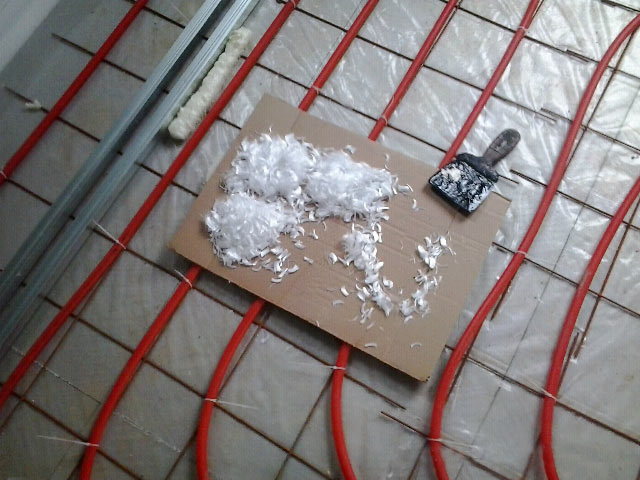
- rozchin of the screed is due to buti plastic when laying and adding fiber and plasticizer;
- at the great kіmnats it is necessary to work shrinkage seams (div. below);
- so it is not possible to give concrete a shvidko shopitis, for which it is covered with polyethylene slick of the coming day (for the next day).
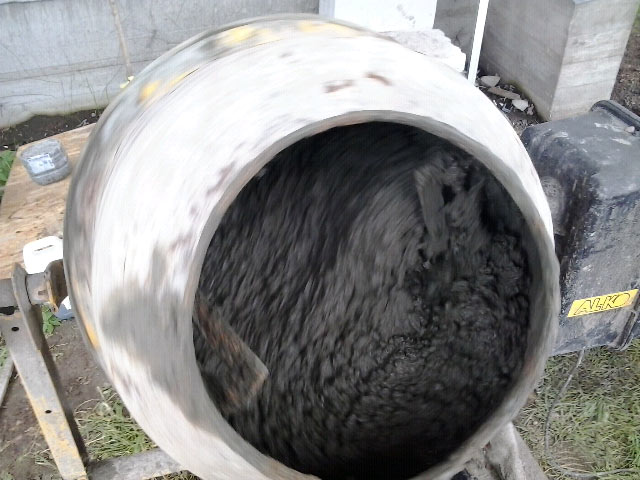
Rozchin for screed
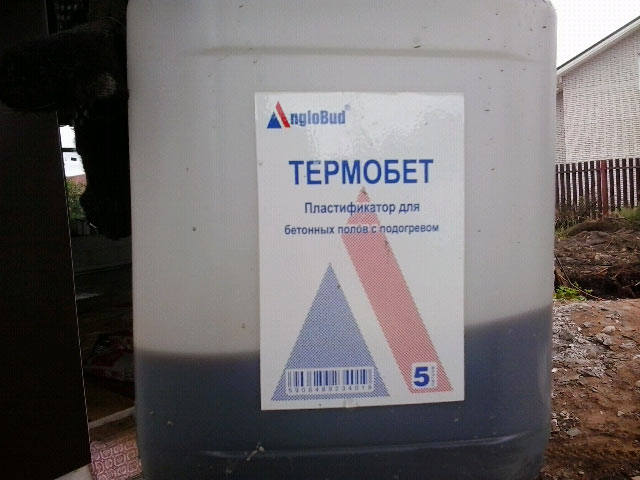
For the heat underlay of the obov'yazkovo vikoristovuvat plasticizer, for the increase of elasticity and plasticity of concrete. Ale zastosovuvati need special types of plasticizers for warm weather.
Without evidence, I can’t see the cement-screed screed for heating without crushed stone / gravel, and the correct branded CPS is more expensive for factory concrete. To that, in order to hide cracks through the damaged warehouse, the concrete itself is poured with crushed stone.
Rozchin M-300 with cement grade M-400, crushed stone and crushed stone vibrate for such proportions.
- Bulk warehouse C: P: W (kg) = 1: 1.9: 3.7.
- Volume warehouse for 10 liters of cement P: W(l) = 17:32.
- From 10 liters of cement weide 41 liters of retail.
- The volume of such concrete M300 becomes 2300-2500 kg / m3 (important concrete)
There is also another option from the choice of granite stone to replace the stone, for the preparation of the same element:
- 2 zebra crushed stone with a fraction of 5-20 mm;
- water 7-8 liters;
- superplasticizer SP1 400 ml retail (1.8 l of powder is diluted in 5 liters of hot water);
- 1 bucket of cement;
- 3-4 buckets of granite stone with a fraction of 0-5 mm;
- the volume of the wind is 12 liters.
Yakisny concrete is not guilty of seeing water during laying (spreading). If everything is done correctly and the temperature is again 20 ° C, the wine is guilty of slumping after 4 years, and after 12 years it will not be overwhelmed by the weather.
After 3 days after pouring, the screed will gain half of its value, and it will be caught only after 28 days. It is not recommended to use the system until this moment. 
Mounting on a wooden pidlog
Wood is not as efficient at conducting heat as it is on top of concrete, but installation on it can also be done. For which vicorist there are rozpodіlnі plates from aluminum. The trumpets are laid at the wooden grooves, reinforced with a path, fastened behind a long distance of prepared planks.
For the installation of linoleum, carpet and other materials that make a smooth surface, a ball is placed above the pipes, which is exposed to chipboard, plywood or GVL. As in the quality of the finishing coating vicoristovuvatimatsya parquet or laminate, the design of warm underlays can be a little bit simple, without stoking the ball, which is virovnyuє.
When choosing plywood and chipboard, go over the fact that stinks can be sanitary and hygienic and thermomechanical indications, which allow you to beat them all at once with warm weather.
Prices for water heat pidlog
The price for heat for the water supply is formed from the number of warehouses:
- variety of materials (pipes, insulation, fastening);
- var_st of the pumping and mixing unit and the collector;
- roboti z virivnyuvannya base and pouring the upper ball of the screed;
- var_st installation of heat podlogi.
On average, the price of water heating and the installation of "turnkey" at the same time with the use of materials and work cost is approximately 1500-3000 rubles. for 1 sq. m.
Below the representations of the zrazkoviy koshtoris on the booths of 100 sq. m., ale prices for water heat should lie heavily in the region, it is best to drive your data there and grow an independent rozrahunok. There is no insurance for installation and purchase of radiators, boiler, finishing touch that screed.
| Koshtoris for the installation of a water heating system, underlays 1 on top. | |||||
|---|---|---|---|---|---|
| № | name of the material | Od. change. | Kіlkіst | Price | Suma |
| 1 | Extruded pinopolistirol 5 cm | m2 | 96 | 227 | 21792 |
| 2 | Mounting grid 150*150*4 | m2 | 106 | 30 | 3180 |
| 3 | Polyethylene fleece 250 mk | m2 | 105 | 40 | 4200 |
| 4 | Metal-plastic pipe 16 mm | m.p. | 700 | 39 | 27300 |
| 5 | Damper stitch from lining | m2 | 30 | 50 | 1500 |
| 6 | Collector Valtec 1", 7 x 3/4", "euroconus" | PCS. | 2 | 1600 | 3200 |
| 7 | Connecting fitting to the collector (Evroconus) 16x2 mm | PCS. | 14 | 115 | 1610 |
| 8 | Pump-mixing vuzol | PCS. | 1 | 14500 | 14500 |
| 9 | Dowels and self-tapping screws | PCS. | 300 | 1,5 | 450 |
| 10 | Assembly line | m.p. | 50 | 11 | 550 |
| 11 | Other accessories for warm water supply | poses | 1 | 0 | 0 |
| Wish for materials | 78282 | ||||
| Name robot | Od. change. | Kіlkіst | Price | Suma | |
| 1 | Black screed | m2 | 96 | 60 | 5760 |
| 2 | Installation of a damper line | m.p. | 160 | 60 | 9600 |
| 3 | Laying waterproofing | m2 | 100 | 60 | 6000 |
| 4 | Laying the mounting grid | m2 | 110 | 150 | 16500 |
| 5 | Pipe installation | m2 | 96 | 300 | 28800 |
| 6 | System testing | m2 | 96 | 20 | 1920 |
| Usyogo on robots | 68580 | ||||
| 1 | Wish for materials | 78282 | |||
| 2 | Usyogo on robots | 68580 | |||
| 3 | Usyogo | 146862 | |||
| Shipping bills | 10% | 14686 | |||
| Usogo behind koshtoris installation of a water heating system under the 1 turn. | 161548 | ||||
Installation of heat water supply for indications on the video:
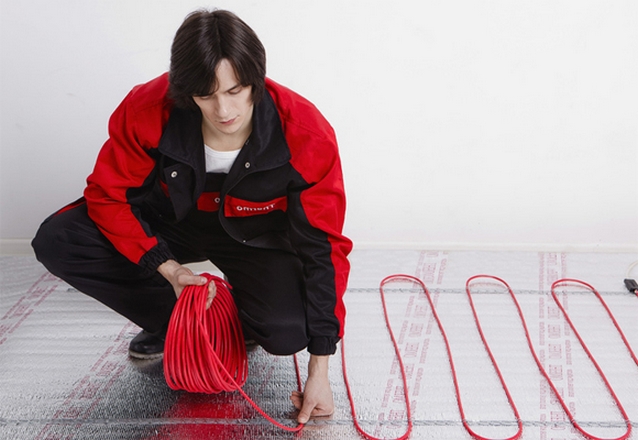
The heat of the day is victorious almost everywhere. Most of yoga is in the bathrooms and children's rooms, on the balconies. Dosit popular є heat pіdloga on the basis electric cable or infrared smelting. Installation of electrical heating sub-logs can be done independently. Prote zrobiti tse need to be correct. Otherwise, the system will not be efficient.
 See systems and recommendations for the choice of sub-logic cover
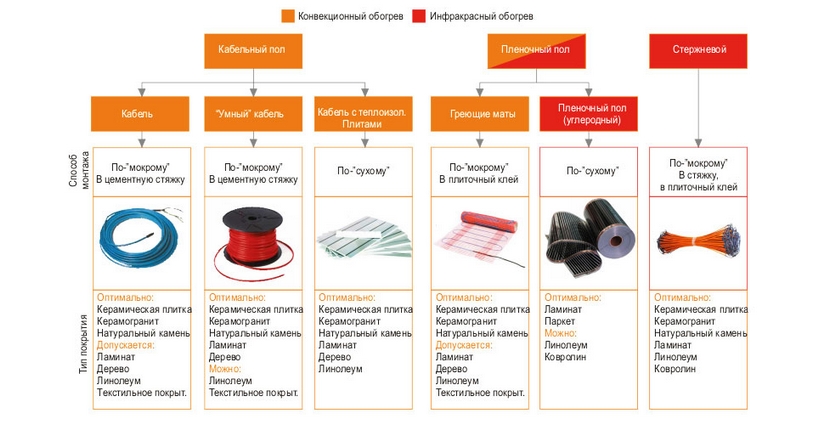
Use the following types of systems:

A small video, a description of the choice of electrical systems for under-logic heating:
What is required for installation?
In order to lay the heat underlay on the basis of an electric cable, a mat or an infrared heater, it is necessary to seriously prepare for work. For the cob slid correctly select the warehouse elements of the system. For example, pay attention to the type of cable. Vin can be self-regulating or resistive. Offenses are seen with success victorious at the installation of heating systems. But another option is to blame for the mother’s garniy contact with a screed, and it is not possible to put furniture on it. What is the cost of a self-regulating cable, then it is only a small amount of high varity.
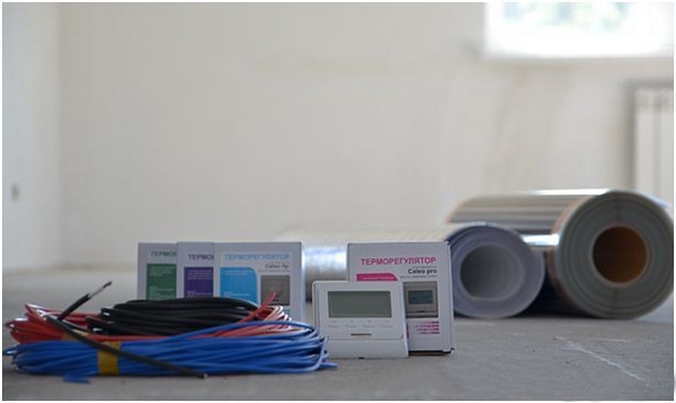 The thermostat is an important element of economical and reliable work and heat supply
 Another important element of the system is є. Tse spetsіalny pristriy, for the help of which pіdtrimuєtsya in the system, the temperature is set. To choose yoga correctly, it is necessary to protect the following parameters:
- Virobu type. The thermostat is mechanical or electronic. New models are equipped with a red-crystal screen. The best way to fix attachments is from the possibility of programming.
- Installation specifics.
- Additional functions. Deyakі models can vbudovanі temperature sensors again, the function of self-diagnostics.
- Between the tightness.
- I'll build a virobnik and vartist. Obviously, you can bring to the market a selection of both domestic and foreign pickers. Perevagu is needed only for popular brands with a strong reputation. Varity will probably be no more than 50-200 dollars.
Features of cable installation
 Installation of cable sub-logs
 Installation of electrical heating sub-logs, which is based on a special cable, transferring the following technology:
- Designed for cable laying plan. To install the system correctly, you need a diagram. It is necessary to decorate the heating elements and design features of the application.
- Designated place for mounting the thermostat. At this stage, it is necessary to open an opening at the wall and make a channel for the dart. The thermostat can be installed in a special plastic box. Give respect to the fault of being at a height of 0.5-1 m.
- Install plastic tubes for power wires of the heating element and temperature sensor.
- Black surface preparation. Vaughn can be equal and clean. In addition, there is additional installation of a damper line on the perimeter of the room. Bazhano on the base of the rosette of insulation, equipping with a ball, what you want. The maximum amount of thermal insulation is 2 div.
- Fixation of the assembly line. The cable itself is attached to it. To restore respect, which should be installed strictly according to the previously painted scheme. If you don’t want to forget, what is the best way to fix the cable at the sight of a snake. Krok kr_plennya str_chki skladє 50 div.
- Cable installation. Before cim, the forces of the darts are stretched to the thermostat. Parts of the cable are not guilty of intertwining between themselves.
- Screed filling. Vaughn is folded from sand and cement. Tovshchina of a coupler kolivaetsya v_d 3 to 5 div.
- Cable connection. Robiti ce after that, as the concrete hardens. At which stage the system comes to life. You can add a trial run of the warm logs. Qiu diyu is also necessary to grind before pouring.
How to install the heating mat correctly?
The technology of laying such a system for transferring offensive actions:
- Preparing an appointment. Naturally, the surface of the base needs to be repelled and propyl sucking.
- Installed thermostat. The whole process seems to be the same, as if in a forward fall.
- Thermal mat flooring. At the time of the victory, a scheme was prepared ahead of time. It is the responsibility of vrakhovuvat those that the mat was not laid under the furniture. Best lay yoga itself in your area tax cover, What will you win for walking. In this way, there are no traces of heat-insulating materials. Rich in time, which can cause the system to overheat. The cable underlay on the substaff needs to be covered with rosettes, vrakhovuchi krok between swarms and reach the walls. Obviously, parts of the mat are not guilty of sticking, but of crossing over. Canvases are mounted "snake". Shchob razgornuti part of the mat, slid to rozrazati in the given missions. Catch the respect that it is necessary to cut only a grid under the cable.
 Technology of laying heating mats
 - Fixation of mother. For whom it is necessary to download the virib back from the roll, take the sack from the adhesive line and cut the net for the outlined scheme. In case of this, do not forget that the guilt is due, but the obov'yazkovo is cleaned from the saw. In another case, the checkmate does not fix on the base as it should.
- Filling the virobu with a thin screed or glue.
Detail video of installation:
Before flooding the system, it is necessary to review the practicality and, if necessary, fix the problems.
How to correctly lay the infrachervonu pіdlogu?
The technology for the installation of the system can be done with idle time, so you can do all the work yourself. It is necessary to respect even more the hour of the connection of the smelting to the life of life. Later, the laying of electrical heat underlays of this type conveys the following sequence:

Like a bachite, the technology for the installation of an electrical heating system is not too complicated. Golovne, connect everything correctly, get to bed, close the contacts and come to the house of life. Leave your comments, dopovnennya that thought!
At the article "How to choose a heat supply" we reportedly looked at the attachment of electric heat supply. There we indicated that there are two types of electrical cables:
Based on heating cable
Based on heating mats.
It’s better to beat the warmth of the log on the basis of mats to save an hour on the installation of the log.
What do you need to pay for when buying an electric bill
We need to work out the rozmіtku pіdlogi. In places where there will be furniture or plumbing, it is not necessary to lay the heat underlay.
Clean up the laying area (I don’t cover the room!)
Multiply the otriman area by the intensity of the heating system necessary for the purpose of the application.
Exhaustion of heat underlay to lie down in the form of heat losses of the same type of application, in which the underlay will be installed. The tables have been given the necessary tension for various applications.
Let's say you have a bathroom with an area of 6 m2. You saw the area, how the furniture is occupied. The area of \u200b\u200bthe free state to become, for example, 4 m2.
4 m²*180 W/m2 = 720 W/m2
In this case, it is necessary to buy an electric heat supply with heat, which costs 720 W / m2 (it can be three more).
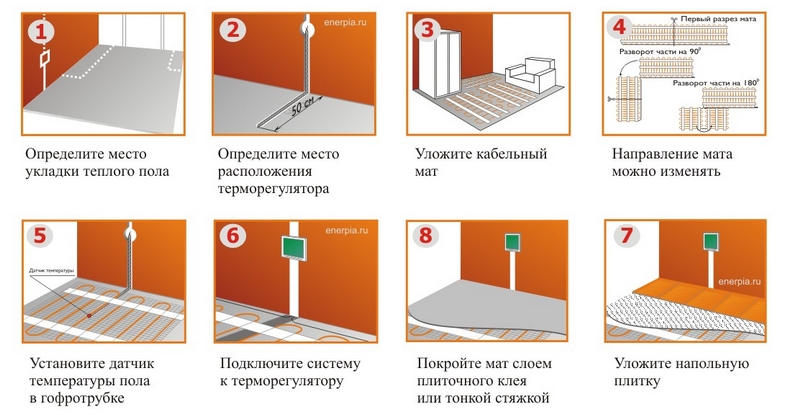
Cable heating systems can be installed at any kind of premises, like at living, so in office and industrial life. Properly laid out installation of electrical heating sub-logs secure the hope safe operation yogo stretching bagatioh rokiv. The installation of electrical heating sub-logs is based on the preparatory plan.
Preparatory work is carried out for a single purpose - the distribution of the necessary amount of materials and elements. The main tasks before laying electrical heat underlays are to loosen the tightness of the heating cable.
Preparation of work before the cob installation
Before that, like a robot, we throw in a small plan:
- 1) - preparation of the place for the temperature controller and the sensor
At the stage of installation, it is necessary to appoint a person, where the thermostat will be installed. The thermostat is installed on the wall, like great vimicach, at the most handy hand at a height of not less than 30 cm from the bottom.
An opening is drilled on the wall for the installation of a thermostat. Perpendicular to the sub-log, in the place where the thermostat is installed in the wall, pass a strobe, for laying in plastic tubes or corrugations of the power cable and the wire of the temperature sensor of the sub-log.
- 2) - preparation of surface preparations before installation
Nasampered, the surface is cleared from the saw, that smittya, it’s the blame for the equal, without pits, that drop. If necessary, the surface should be covered with a screed, the thickness of the screed should be no less than 3 cm, as the ball will be thin - the screed will crack. The optimal thickness of the screed is 3-7 div.
Before pouring the screed, it is necessary to coat it with a primer, to paint the surface contact with the cement-pasted screed. In addition, as the primer is dry, it is necessary to expand the space, it is not necessary to install warm underlays (stationary furniture), so the steps in the walls to the heating cable (not less than 5 cm) must be covered.
- 3) - laying insulation
In order to heat the premises, it is economical, it is necessary to change the heat input. For this medium, a heat-insulating ball is laid with a concrete base and a heating cable. The heat-insulating ball allows you to change the heat loss up to 30%.
Thermal insulation is installed:
• vertically - along the perimeter of all walls of the bіla pіdlogi. For this purpose, thermal insulation has to look like a special damper line or a large polystyrene sheet with a width of 15-20 cm and a thickness of about 1 cm.
• horizontally - on the concrete base of the underlay, close to the vertical insulation, lay the sheets of the heat-insulating material of the curtain not less than 2 cm. It is possible to extract materials from such warehouses, such as pinopolistyrene, pinopropylene, cork agglomerate, fiber-mineral slabs.
How electrical heat is installed at the premises promoted vology, a waterproofing ball is laid on top of the heat insulation. Tse zabіzhit penetration of vology into the basis of pіdlogi. It is especially relevant in apartments, so that the future did not have problems with the susis from below.
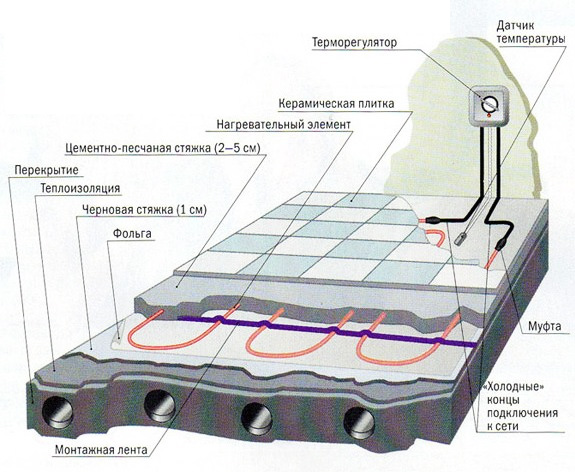
Front cement screed and fixed mounting line
Before laying the heating cable on the surface of the thermal insulation, a cement-food screed is poured. The screed ball will help to prevent overheating of the heating cable, as well as to create a mitzna base for laying the heating cable.
For some reason, it is not possible to organize the front screed, you can lay the cable on a metal mesh laid on top of the thermal insulation (with a thin center of 1-2.5 cm). Sitka, in this way, at the same time we will lay it on top of it with a heating cable. finishing screed in one go. Behind the metal mesh, the screed will go out with a metal and monolithic.
After a sufficient hardening of the cement-food screed, the underlay is covered with a special foil thermal insulation (mounting foil). The entire surface of the pads is covered with foil, they are laid on the sticks with a margin, and the edges are glued with foil tape, so that they do not catch on the cable during the installation process.
Such a heat-shielding screen at the sight of the foil is suitable for an equal distribution of heat over the entire surface of the warm underlay.
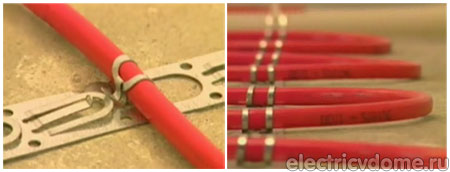
For a superficial fixation of the heating cable, a vicorous mounting line is required. Lay a mounting line on the surface of the pads through the skin 50 cm and fasten behind the help of wonderful colors or screws.
For fixing the cable on the mounting line, transferring special brackets, stitched with equal crochet, one type of one on the whole length (as a rule, 25 mm). For the help of these brackets, it is easy to get the required cable laying.
Installation of heating sections
It is necessary to turn back to the previously folded plan of laying the heating cable, respectfully note such details as the order and the laying-out.
Before that, how to unwind the cable, it is necessary to reverify yoga opir. The rosemary of the wintry support is recorded in the warranty card. She is guilty of zbіgatisya z ієyu, scho indicated on the label cable sleeve. Admissible inconsistency ± 10%.
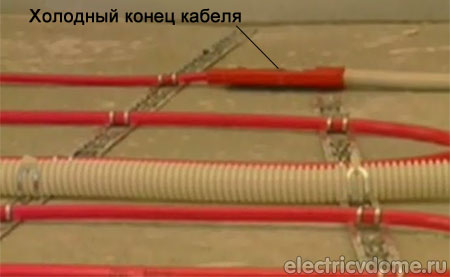
The cold end of the two-wire heating cable is inserted into the corrugation and the back of the prepared strobe is installed. A good muff and a cob of the cable are fastened on the bottom to the mounting line and the cable is laid from the beginning of the month. Moreover, the lucky clutch is guilty of roztashovuvatisya on a pіdlozі in such a rank, so that the bula was completely filled concrete screed.
At the process of laying, it is necessary to follow it, so that the lines of the cable do not stick and do not cross, and also to trim the fast laying by stretching the heating area. In areas where the cable is needed, the radius of the cable is not to be blamed for being less than 5 cm.
The end sleeve of the two-wire heating cable is fixed on the mounting line with the same mind, which is good - it is to be covered with a concrete screed. If a single-core heating cable is used for the installation of a cable system and heating, then when laying down the laying scheme, it is necessary to secure that the wires to the cable will be connected to the thermostat.
Installed and fixed temperature sensor and thermostat.
If the cable will be laid all over the surface, it is necessary to install a temperature sensor. Mount yoga in a corrugated pipe and install at the same time with the life-giving end of the heating cable in one gate. On the end of the tube, where the thermostat will be, a plug is placed, so that it does not need to be broken.
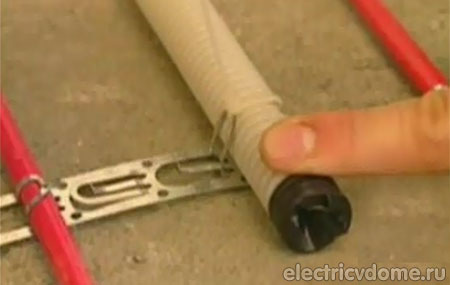
The tube with the sensor is placed on the bottom, between the lines of the heating cable, not overlapping. In order for the temperature sensor to function normally together with the tube, fix it in the middle of the line cable on the mounting line. The temperature sensor for the connection with the tube is responsible for rotting the cable at least 50-100 cm long.
The thermostat is installed and connected after three wires have been brought to a successful box: the wire of the temperature sensor, the heating cable, the wire of the heating cable, and the wire of the wire with a voltage of 220 V. It's not safe!
At this stage, the installation of the electrical heating system is completed. You can proceed to the filling of the cable system and the heating with a cement-food screed.
Vlastuvannya cement-food screed or bulk pads.
Before that, how to fill the cable heating system with a screed, it is necessary to switch at the same time. For which heat is turned on for a short time. Scheme of laying heat and logs It is necessary to paint over the placement of successful and terminal couplings, and rather take a picture and include it in the warranty card.
Coupler pid electric heat supply better prepare іz specially recognized for tsogo sumіshi. Fill in the river cement food sumish on the surface underlays it is necessary to be even and neat, without damaging the insulation of the cable. It is necessary to keep the screed, so that the process of pouring the screed does not cause stinging of guts, shards of stench increase the supply of heat by the heating cable.
The thickness of the screed is due to become approximately 3-5 cm.
After the hardening of the screed vzdovzh walls, it is necessary to cut the protruding parts of the insulation (like the stench). Then you can proceed to laying the flooring for the underlayment (ceramic tiles, etc.).
Similar materials on the site:


