Rules for the installation of electrical wiring near a wooden booth
In terms of electrical installation, wooden objects are the most convenient objects. We have prepared for you the rules of how to install wiring in a wooden booth, de reportably look at the power supply for the choice of materials and cable laying systems, as well as the installation of installation fittings.
1. Carrying out at the compliance with the standards
The organization of electrical installations in a wooden booth is done for the folding of more than one piece on an unknown polystyrene foam formwork. Laying on combustible bases is allowed only in a critical way, or because of the stovidsotkovy localization of the conductor in the middle of the back shell.
Tsya vomoga not so strict to frame internal partitions with non-combustible lining. In the most correct version of the cable passing through the racks of the frame, it is accompanied by the sleeves of the rest, in practice, the conductor is usually wrapped around the corrugation or the metal sleeve, ensuring the change.
Laying in a critical way is also a bad solution. A number of fittings and installation techniques have been transferred to make the wiring look aesthetically pleasing and add some color to the interior. Krym plastic cable channels can be laid on the PV-1 dart wound on ceramic insulators and vikoristannya body fittings of non-recessed type. At the time of the attached gaskets, there are non-combustible grades of the cable: VVGNG or KGNG.

Due to the foldability of the installation, the distribution of the cable along the walls can be reduced to a minimum. And for whom it is necessary to thoroughly think over the scheme for laying cable lines.
2. Scheme of breeding along the walls and stele
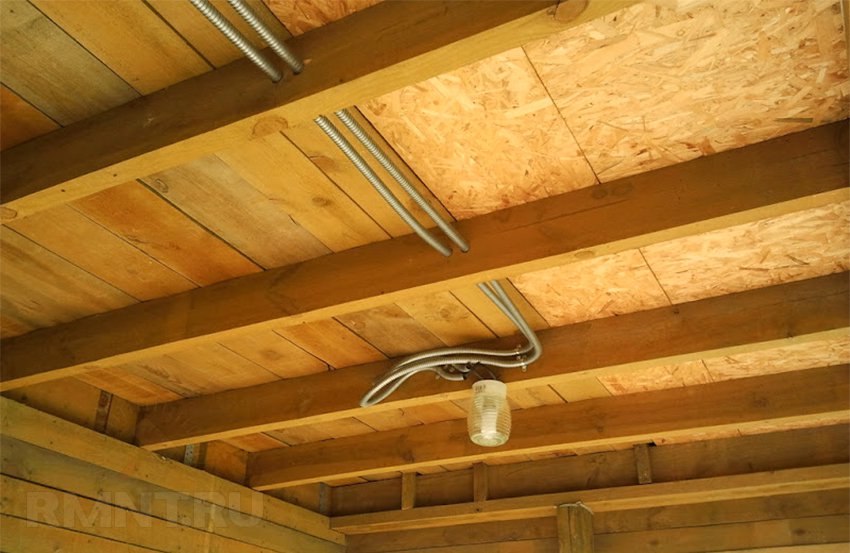
In the most acceptable variant of electrical wiring around the house, the skin electrical point is connected along one straight line with the frame underlay, we will cross or blacken the stele, we will close the underlay or the tension covers. According to the technological empty, attached to the eyes, all the main developments are victorious, often wanting to simply stretch one by one to the group shield. Obviously, the main mass of sockets and vimics should be placed on the inner walls, and on the fences - only if necessary.

A reasonable solution would be to lay the wiring for lighting from vimikachiv to the wall, and wires for connecting sockets to the wiring. Due to their small capacity, the lines of lighting lines can be organized for the help of soldering boxes that are inaccessible for maintenance. It is enough to bring the line of life from the automatic vimikacha to such a box, and from it, lower it to the key of switching that along the thread of life to the skin lighting group.
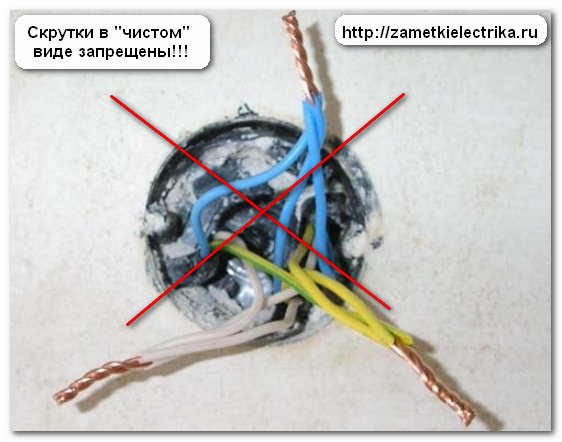
Lines of rosettes and a group of common recognition are allowed to be connected to the so-called garlands. It is important that three more than two veins were fixed at the skin terminal grip of the sockets. In a different way, the skin rosette of that group is connected at the attached rose boxes, and the lines with especially high tensions in the case of butt technology and heating are straight up to the group shield without opening.

Cables, which are picked up on the wall at the group shield, are recommended to be twisted with a decorative casing. When laying cables as a group, it is also recommended to install a base with a non-combustible lining, for example, with drywall.
3. Localization of conductors and painting
For some reason, the installation of external wiring may be unacceptable. In this direction, the plant is bagatarily folded, regardless of those that part of the wiring that is laid along the walls, become only 15-20% of the total length of the lines.

Possibility of attached laying can be laid even at the stage of front picking of the cut. Depending on the plan of internal electrical supply, technological channels for the cable are prepared near the walls of the world. Vykoristovuyut for the electric chisel, or the crown part of the drill. The orientation width of the channel is 30-50 mm.

At the perimeter of the frame system, the sublogs of the overlaps are drilled open. The installation of electrical fittings can be drowned by the method, for which the channel is known with a probe and drilled with a crown drill 60-80 mm, drilled into the timber array. Boxes for sockets and vimikachiv need to be made of steel, bazhano with an insert of cloth.

Dіlyanki pipes, laying in the middle of the walls, due to buti localization in the middle of the middle. Vykoristovuetsya for this smooth pipe: metal with a torso wall of 2.5 mm or steel of 1.2 mm. The value of the orientation, the more accurate rozrahunok vmagaє vrakhovuvat navantazhennya and voltage on the line, as well as the type and number of conductors in the middle of the shell.
For rozgaluzhennya lines of power transmission, prihovany at empty frame structures, it is recommended to vikoristovuvat metal boxes. For the internal installation of a fire protection from a wooden saw with a step not lower than 3, the water protection specialist is not insured. The introduction of the sheaths of cable lines should be expanded or equipped with an intermediate ring or a nut, which does not allow expansion.

4. Zahisnі outbuildings
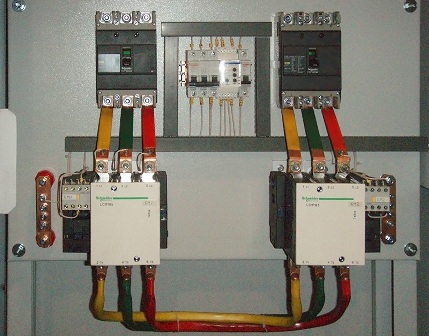
Electrical installation at a wooden booth can be complicated by special features, I will add group and separate shields. Vіdminnіst poserіgaєtsya both in the method of installation of housings, and in the selection of zakhisnogo obladnannya.
The installation of the electrical shield housing is to be carried out on a non-combustible base. Therefore, under the central shield from the ASU, it is recommended to upholster the surface of the lining, and when the group shields are installed, it is recommended to lining up the lining with textolite or cloth.

Sound group shields with crossovers and use it manually for an additional cable channel, in which 3-4 lines are laid for the skin room. It is not recommended to place shields close to the stele or underlays.
Zahisnі avtomaty podbirayutsya zgіdno z admissible strum for the cable on the line, scho to go, vybir zvzhd zdіysnyuєtsya in a bill of a smaller denomination. The property, which does not have an internal noise due to a short flicker, as well as a line with fixing the maximum tension (perfume, air conditioning), is connected through an automatic switch with a nominal value for slowing down the pressure and a low noise when recharacterizing the spratsovu.

At wooden booths, it is customary to lay wiring for a three-wire circuit, such a conductor does not lead to zero. The reasons for the establishment of a differential strike in the presence of a strum strike can be accompanied by hypoxia. And the axis of the differential automaton is of the protipozhzhego type, which, according to the turn in the insulation, will be darker.
5. Installation of replacement fittings and fittings
At the final stage, the installation of electricity is carried out. The simplest thing to do is to use non-recessed fittings. It is easy to screw it to a wooden wall with a pair of screws, winding it in front of the body and connecting the wires.

More hours and more forces are breaking on the installation of attached (drowned) fittings. A flat surface is required for a narrow connection of the frame, so the decks are turned forward with a planer. They let the opening pass, which connects the surface with the attached channel. It vikoristovuєtsya as a centering when drilling the installation niche with a crown cutter.

It is characteristic that the installed boxes can be immured in the same way, like in a stone wall with a path of landing on an alabaster. In a different turn, the region is guilty of buti localized and tied to the cable channel with a non-combustible hard sleeve.