Yak zrobiti electrical wiring in a wooden booth
- an important and viable process, which will require specific knowledge and dotrimannya safety rules. It’s better to entrust such a robot to an informed and competent master.
Electric installation robots in a wooden booth are blown by hard, anti-burning widows; To avoid problems and install the electrical wiring correctly, it is important to comply with the daily norms and rules (SNiP) and the rules for the installation of electrical installations (PUE). Let's look at how to conduct electricity with your own hands.
Stages of electrical installation at the zamіsky booth
- Scheme of distribution and expansion of pressure, supply of materials (cables, sockets, etc.);
- Connecting the cable to life until the wake-up call and introducing electricity to the booths;
- Laying cables and wiring;
- Installation and installation of lighting fixtures, sockets, lighting equipment;
- Vashtuvannya grounding and zahisnogo vіklyuchennya;
- Nalashtuvannya that doslіdzhennya roboti electricians.

How to properly conduct electricity to the booth
To conduct electricity in a wooden booth, it is necessary to lay a cable between a power line support (stovpom) and a rose under the switchboard. Such a cable is called introductory or life-giving. The cable can be laid in an underground way.
The repeated method is a quick, easy and economical option, which transfers the introduction of electricity at the houses to repeat. This method of installation does not require serious penny costs and does not take a lot of time. However, wine destroys the aesthetics of life and can harm chagars, trees and other tallness.
Laying a trench is a labor-intensive and expensive process, proteo- native and long-term. In addition, the underground line does not destroy the façade of the booth and does not disturb the greenery.
With this method, to make a trench with a depth of one meter, a pillow is laid on the bottom with a height of 15-20 cm and only then a cable is laid. After laying the wires, they sip 20 centimeters in sand and 50 centimeters in the ground. It is important to insert a signal line and then we’ll only sweat the trench to the end.
The input cable supplies voltage to the switchboard of the booth, the sounds of life are expanded by electric switches in the middle of the room. On the switchboard of the electrical outlet, they install automatic switches and switches, grounding and other extensions. Qi elements are needed for the supply of electricity and for security.

Installation of electricity in the middle of the booth
In front of him, like a viconate electrical installation with his own hands, a scheme of divorce is put together, the tension and tension are being developed. The scheme includes a plan for a booth and the installation of lighting fixtures for skin tightness. In addition, to repair the lighting system of the land plot (yard maidanchik) of the electricity generation group, with the help of which the lighting fixtures are divided.
At a small booth, all lighting fittings can be connected to one group. And then I’ll push the butt’s equipment for the first time, they connect it to an OKremo group of liveliness and give it an individual automatic switch. All water heaters and stoves, gas and electric boilers, electric furnaces and other equipment with high heat. For the skin group, it is necessary to fix the total exhaustion of electrical appliances, as they can get in the way at once.

The installation of an electric wire in the middle of a booth is divided into two methods, and the most critical and closed.
The overhead method or the wiring is a simple and cheap method, if the electrical wires are laid on the surface of the bed and walls. From the other side, the operational option. Zalezhno vіd ploschі pіschennya and kіlkostі elektroobladnannya installation loan 2-14 days.
The great plus of this method is that you can easily add new spozhivachs (sockets abo vimikachi). Ale, in a broken block of PVC boxes, they are laid perpendicular to the walls of the building, and are deformed through the shrinkage of the building.
The electrical wiring is attached to a wooden booth, subject to trial and error installation, with which wires are laid in the middle of the elements between the ceilings and the walls. A scheme is attached more suitable for a wooden booth, so that the wiring does not deform when it shrinks. In addition, it does not destroy the internal design, even if Provid is hidden behind the walls, the sockets are visible only less visible. However, such a way of costing more expensive and adding new supporters will be problematic.
After that, as you chose the method of installation, you folded the scheme, picking up window materials. Lay down the cable in the tightness and number of phases. They see a single-phase line for 220 volts and a three-phase line for 380 volts.

Yaki droti vibrati
| Peretin | Strum (A) | Intensity, kW) | ||||||
| 220 V | 380 V | 220 V | 380 V | |||||
| M* | BUT* | M | BUT | M | BUT | M | BUT | |
| 1.5mm | 19 | 22 | 16 | 19 | 4,1 | 4,4 | 10,5 | 12,5 |
| 2.5mm | 27 | 28 | 25 | 23 | 5,9 | 6,1 | 16,5 | 15,1 |
| 4 mm | 38 | 36 | 30 | 8,3 | 7,9 | 19,8 | ||
| 6 mm | 46 | 50 | 40 | 39 | 10 | 11 | 26,4 | 25,7 |
| 10 mm | 70 | 60 | 50 | 55 | 15,4 | 13,2 | 33 | 36,3 |
| 16 mm | 85 | 75 | 70 | 18,7 | 49,5 | 46,2 | ||
| 25 mm | 115 | 100 | 90 | 85 | 25,3 | 22 | 59,4 | 56,1 |
| 35 mm | 135 | 115 | 110 | 29,7 | 75,9 | 72,6 | ||
| 50 mm | 175 | 165 | 145 | 140 | 38,5 | 36,3 | 95,7 | 92,4 |
| 70 mm | 215 | 200 | 180 | 170 | 47,3 | 44 | 118,8 | 112,2 |
| 95 mm | 260 | 230 | 220 | 200 | 57,2 | 50,6 | 145,2 | 132 |
| 120 mm | 300 | 260 | 66 | 171,6 | ||||
*M - medium darts; A - aluminium.

Installation of wired and wired wiring
After choosing the required materials, lay the cable to the booth in a repeated way, or for additional trenches, and then install the electrics in the middle of the premises. Wiring is attached to go for a wooden house; In this case, the cable will be covered and will not sag. Installation of the attached installation includes the following rules:
- The interval between the cable to the wall should be at least 15 cm, to the door and window openings - not less than 10 cm;
- Vіdstan mіzh wires and opalyuvalnymi batteries may be over 3 mm;
- Conducted installation is strictly horizontal or vertical. No diagonal laying!;
- Sockets are placed on a distance of 0.5-0.8 m from the pidlog, vimikachi close to 1.5 m from the pidlog. In case of any leather, the type of spozhivachіv is located at the same height from one side of the door;
- Check that the lichniks, boxes of rozgaluzhennya, vimikachi and sockets are to be blamed but in easily accessible places;
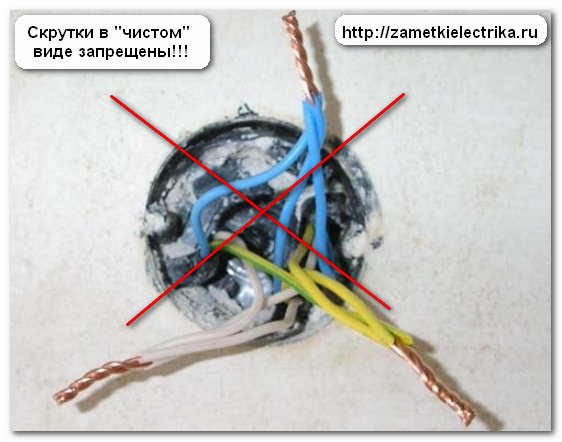
- It is important to unify the crossbar of darts. Just don’t go in, fill the space of at least 3 mm between the outer insulating ball of wires;
- Kozhen drіt ide vіd dzherel zhivlennya (SHIELD) to spozhivach (socket, light bulb, vimikach toshcho) okremo.
Wiring was attached with a large number of cables that time for installation, shards of leather wires are mounted okremo. Vіdkritiy method transfers more swidky and easy installation, that is optimally suited for the one who installs to carry out the installation of electrical wiring in a wooden booth with his own hands. Schobbiti v_dkritu wiring, vikoristovuyut PVC boxes or cable channels.

Grounding and closing robots
Grounding and attachment of a power supply (PZV) are necessary for the safety of people and the power supply. For grounding, you need to put in a ready-made structure, or you make it with your own hands.
In order to vikonate grounding with your own hands, it is necessary to make a three-fold trench with a sag over 30 centimeters and with sides one meter each. On the kutakh dig three mid-points of the headstock 2-3 meters. Shtir is z'ednuyut with rivets from vikoristannyam zvaryuvalny apparatus. In one corner of the tricot, the opening is broken, the conductor is fixed, which is grounded, which then we lead to the shield.

When choosing the ELV, respect that the nominal strum will be attached is to be blamed for an order of magnitude greater for the strum of an automatic vimikacha. Strum coil should be chosen fallow in view of the type of application and fittings that are connected. After the installation of fahivtsі, carry out the verification of electricity, after which the protocol is seen. The breeding scheme is glued to the wall in the middle of the shield.
Incorrectly designed and installed wiring causes problems with the supply of electricity and sometimes lead to fire! Only a professional design of the project, the correct selection of materials for installation, including the flickering and guaranteeing safety. Regardless of the choice of the method of conducting electrical transmissions, it is important to pay attention to compliance with the norms of BNIP and PUE.
The electricians of the company "MariSrub" are already at the stage of creating a scheme for the installation of power transmission lines for the project of a booth in a warehouse, so that they could be removed during installation!