How to connect a chandelier with three wires
The chandelier can be brought up to these objects of the interior, knowing what people repair in a practical way among the people. Silence, whether to lie in a stroller or lie down, look at the garnier attachments on the stele, which shines. Be-yak, the room in the apartment is large, and the house is obov'yazkovo possessed by a chandelier, as if it were fixed at the center of the stele. It doesn’t just become the color of the interior, but it allows you to evenly expand the illumination of the atmosphere with the spaciousness of the room. In order to vary the lighting, the most common use of vicarist is chandeliers for 5 or more light bulbs. About such lamps and timetsya at tsіy statti. Let's talk about those, how to connect a chandelier with 3 wires, what is needed for such a robot and how can people work without special electrical education?

On the current market of performances there is a wide range of lighting fixtures with smart designs, a great number of light-emitting diodes or lamps, with remote control panels. However, dosі more vvazhає for the better to install a p'yatizhkovu chandelier at your living quarters.
If such a chandelier will be connected to a single vimikacha, it will cause a great waste of electricity. Wait a minute, don’t start it necessary, so that all five ridges shone at the kіmnati, sometimes you can finish two or three. That is why the most popular scheme is the connection of a chandelier from a chandelier. We say about such a scheme just below, but before that, turn on the chandelier to the double-button double-key lamp, let's figure out why a similar lamp is made up and like a wine of power.
Nasampered, this is the main structure for 5 ridges. Regardless of where the lamps will be directed (down or uphill), the fastening of cartridges and plafonds with ribs is fixed, however, behind the help of threaded z'ednan. The leather rіzhok at the end may look like a tube with cuts, її a decorative lid is attached behind the additional nut. Ale, even more often, it is fastened on the back of the patron’s day, which is wound on the rizhkove of the thread. At the cartridge, it is necessary to bring darts and screw in the light bulbs, and in the new one you will have their non-intermediate contact. Ceiling lamps serve to expand the light, and also serve as a decorative function, most often they are made of metal, or even plastic.
The wire on the chandelier is most often used in the middle of the metal structure. The plafonds are fastened to the body of the lamp for additional braces, bolts or a plastic ring, as if screwed onto the thread of the cartridge. From the skin cartridge in the middle of the neck to the right box of the lamp, it is necessary to go 2-wire.
Lamps on the chandelier can be installed in different ways - heating, luminescent, light-emitting diode, energy-saving.
The housing of the chandelier can also have a living block or a ballast for starting light and fluorescent lamps.
There are chandeliers, possessed by widows, like they can make a mirror surface and create straight light.
Reporting about how to choose a chandelier and a lamp for it can be found in this video:
Tool

Before that, how to connect a chandelier with three wires, prepare the necessary tool:
- Indicator twist (you will need to designate a phase and zero).
- Pasatizhi insulated handles.
- Nіzh (to know the insulation on the cores).
- Multimeter.
- Isolation line.
- Twists (flat and cross-shaped).
- Shmatochki.
- Marker.
Prystosuvannya, for the help of such people, darts will come. There can be special pads, in some cases, the screw is pressed, spring or well insulating zatiskachi (ЗІЗ). Well, do not forget, obviously, about the drabin.
Assignment of wires
Before that, how to connect a room chandelier with a double-headed vimikach, let's figure out how much we need darts and why we need leather from them.

butt instructions for choosing a chandelier (press to enlarge)
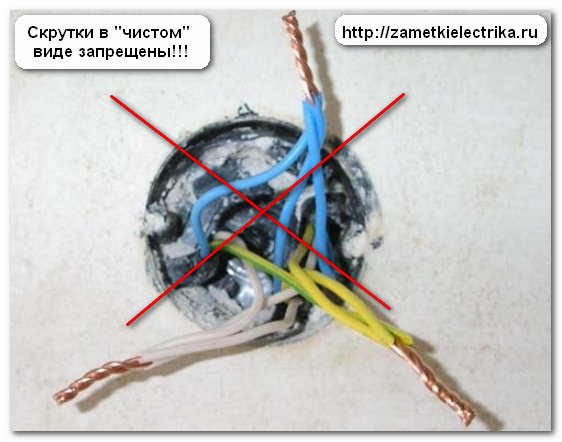
If any illuminating device is to be blamed on the mother's passport іz assigned to the new scheme. It is important to remember, there is a sign of recognition of darts for colors. As a rule, the phase is marked in white or brown colors, the blue wire means zero, and maybe the third wire of the sound grounding, which may sound green or yellow. Usogo s chandeliers may appear 4 lived - zero, zahisne grounded and 2 phases.

There are no passports for lighting fixtures, but they themselves are significant, de phase, and de zero.
Otzhe, you have a stela є dirka, from which to wash three lived, one of them is zero, and two of the other phases are like a two-key vimikach. If your chandelier is from your own grounding, then for whom there will be a fourth quarter.
- Turn on the machine for living in the apartment and set the keys of the underwire mic to the “On” position.
- To hide the zamikannya, to separate the three lived, to wash the walls, to stand alone in the same way killed.
- From the skin lived approximately 1 cm to increase the insulation.
- Turn on the pressure, turning off the machine, and then let's turn it off. The indicator twists of the skin lived, but if the contact of the indicator does not glow, it will be zero. Designate її for an additional marker.
- Now turn on the keys on the keyboard using your call and revise the visibility of the phase.
Appointed lived at the lamp for the help of a multimeter:
- For the first time, set the "Calling" mode on the accessory and short the probes for 1 second. The sound signal is to blame, which means that you have correctly chosen between the vimiryuvan and the instrument of reference.
- The cartridge has 2 contacts, one of them is phasic, springy and roztashovuetsya in the center, the other is zero, vіn roztashovyatsya from the side (if the light bulb is screwed in, it will stand with its own base).
- To clean up also for 1 cm mustache chotiri lived, which come out of the chandelier.
- Now you need to know the zero vein. Apply one multimeter probe to the zero (bit) contact in any cartridge. With the other probe, stick around with the cleaning darts. As soon as you feel a sound signal, it means that the vein is zero, so you can also signify її for an additional marker.
- In a similar way, the reliability of two phase conductors, which enter the lamp, is determined. For the first time, use the probe of the multimeter to touch the central phase contacts of the cartridges. In a five-horned chandelier, one phase lived with three rounds of cartridges, and another two were missing.
- To change the ground wire, you need to touch it with one probe, and with the other metal body of the lamp, a sound signal confirms the correct choice.
Scheme of one-key vimikachem

For the cob, let's look at a simple diagram - how to connect a tririzhkovu chandelier with 3 wires. Here are three reports of cover instructions. Reverse the complete set of the lamp:
- Look at the factory packaging, find out the exact number of sets that go up to the chandelier, and look for a list of all the warehouses.
- Find a bracket, for the help of which chandelier can be fixed to the wall. Vіn є slat, yak without intermediary screwing to the wooden base in the stele, and even to the tsієї slat the chandelier cover is fastened.
- Reverse the presence and the coherence of the plafonds.
- Dali may be attached (you can call it a happy chandelier box), in which the wires are separated, three ridges are attached to the new one, and the whole mechanism itself is attached to the cover of the bracket. Through this extension of the stretching zdvoeny wire (the phase of that zero lived). One end of destinations is connected with the phase and zero conductors, like going out of the holes in the stele, the other end of assignments for the connection with the conductors in the rivers.
- Sound the third wire of grounding, which is included in the complete set of the luminaire. On the metal case (mostly on the roof) with a special badge in the place, where it is necessary to attach the grounding.
- Reverse the appearance of three rіzhkіv, but they can be fixed cartridges on them and from the skin may come out phase and zero vein.
Now we can see how the darts are at the chandelier:
- Take one rіzhok and I'll get a box of a lamp, de bude will rise. Z r_zhka come out two lived (blue - zero, brown - phase). Stretch them in one of three openings and close the rib.
- Analogous work with two other horns.
- As a result, in the lucky box of the lamp, there were 6 wires in the rіzhkіv - three blue and three brown, and double 2-wire wires, which will be carried out from the railing.
- On all six cores in the rivers and on the double dart, clean the insulation.
- Combine three blue darts with one double vein dart, and in the same way tie three brown darts with another double vein dart. Zrobitse for help twisting, you can still solder to the beast. Put on insulating caps, as a rule, the stench goes with the kit.
- Carefully place all the darts in a good chandelier box and cover with a lid.
- At the appointed place, connect the wire of the protective grounding.

We have lost the connection of our chandelier with three wires to the edge:
- The first part of the electric part is robit, start the installation, turning on the life-saving machine.
- To fasten to the wooden structure in the stele the frame for the help of the big wood screws. You need to work as much as possible and nadiya, to that the plank is guilty of vitrimuvating the chandelier's vag.
- So that we don’t overdo anything, immediately reconcile the lamp, lightly making decorative bolts. To marvel that everything is in power with you, turn the bolts and proceed until the end of the wire.
- Bazhano vykonuvat such a robot with a partner, so that one person could trim the lamp that is connected, and the other one will take care of the day. If you don’t have a partner, then fasten the lamp to the installed bar, moving it on a string or a piece of cotton wool.
- Reply from what they lived on, what to wash from the dirka in the stele, put on self-tight terminals. Let's come to them in the light of the living lamp.
- Now you can see the automatic machine and vimikach, so that you can correct the correct work. As if all three lamps were blown off, turn on the vimikach, the automatic machine and finish the work, screwing the lamp to the bar.
Now you know how to correctly connect a chandelier for three horns, let's take a look at the folding option - connecting a chandelier to a hanging chandelier.
Scheme of the two-key vimikachem

The connection of the p'yatizhkovo chandelier to the butt-button double-key vimikacha is similarly connected.
- Out of the box, where the zero vein is, as it is laid to the lamp, all five zero veins in the form of a skin lamp are connected with it.
- The phase lived from the box to go to the two-key switch, and two lived from the new one, as if to apply voltage to one and the other group of light bulbs.
- At the rozpodіlnіy korobtsі zero and fazna lived zadnuyutsya z phase and zero lifeline.
- The lucky box of the lamp has 6 wires, like the three-wire option, now 10 will be wired (5 phases and 5 zeros).
All five blue zero veins at the lamp must be bundled into one charred bundle. And from the phase wires, form two successful bundles - one of the three brown wires is like light bulbs, the other is like two. That is, when one key of the vimic is turned on, three lamps will light up, and when the other key is turned on, two.

A lucky chandelier box has three darts. One of the ends was seen at the upper part and reached the veins, led up to the dirka in the stele to the place where the lamp was fixed. Other kіntsi z'єdnayte such a rank:
- Blue zero lived from a lucky bundle of five zero lived from the lamps.
- One phase conductor, for example, brown, from a bundle of phase conductors of three lamps.
- The other phase conductor, for example, was white, with a bundle of phase conductors of two lamps.
Three dirks in the stele, at the mist, where there will be a lamp fastening, you have three cleansings to wash. Z'ednayte їх vіdpovіdno z phase and zero veins of the chandelier. At the exit from the zahisnym grounding of the lamp, there will be a fourth inspection of that day.
You see, for an analogy with a larger simple option, connecting a chandelier to a hanging vimikach is also awkward. More details about the connection of the chandelier can be looked at in this video:
I would like to give a small joy of cheap Chinese chandeliers. After the purchase, turn over for the integrity of the wiring. They often have already selected all the electrical parts in a good chandelier box, reversing the reliability of contacts. If it’s covered, then we’ll have a chance to remake such a majestic work.
Now you know how to connect a chandelier with 5 or 6 chandeliers to a hanging chandelier. In principle, as well as basic knowledge of electrical engineering, it will be awkward for you. Then, spare a little bit for the call of a professional electrician.